Overview
OTPless SDK accepts the user’s identity (phone number or email), authenticates through multiple channels, and returns a secure token upon success.The merchant app sends this token to its backend, which verifies it with the OTPless Server before proceeding with the user journey.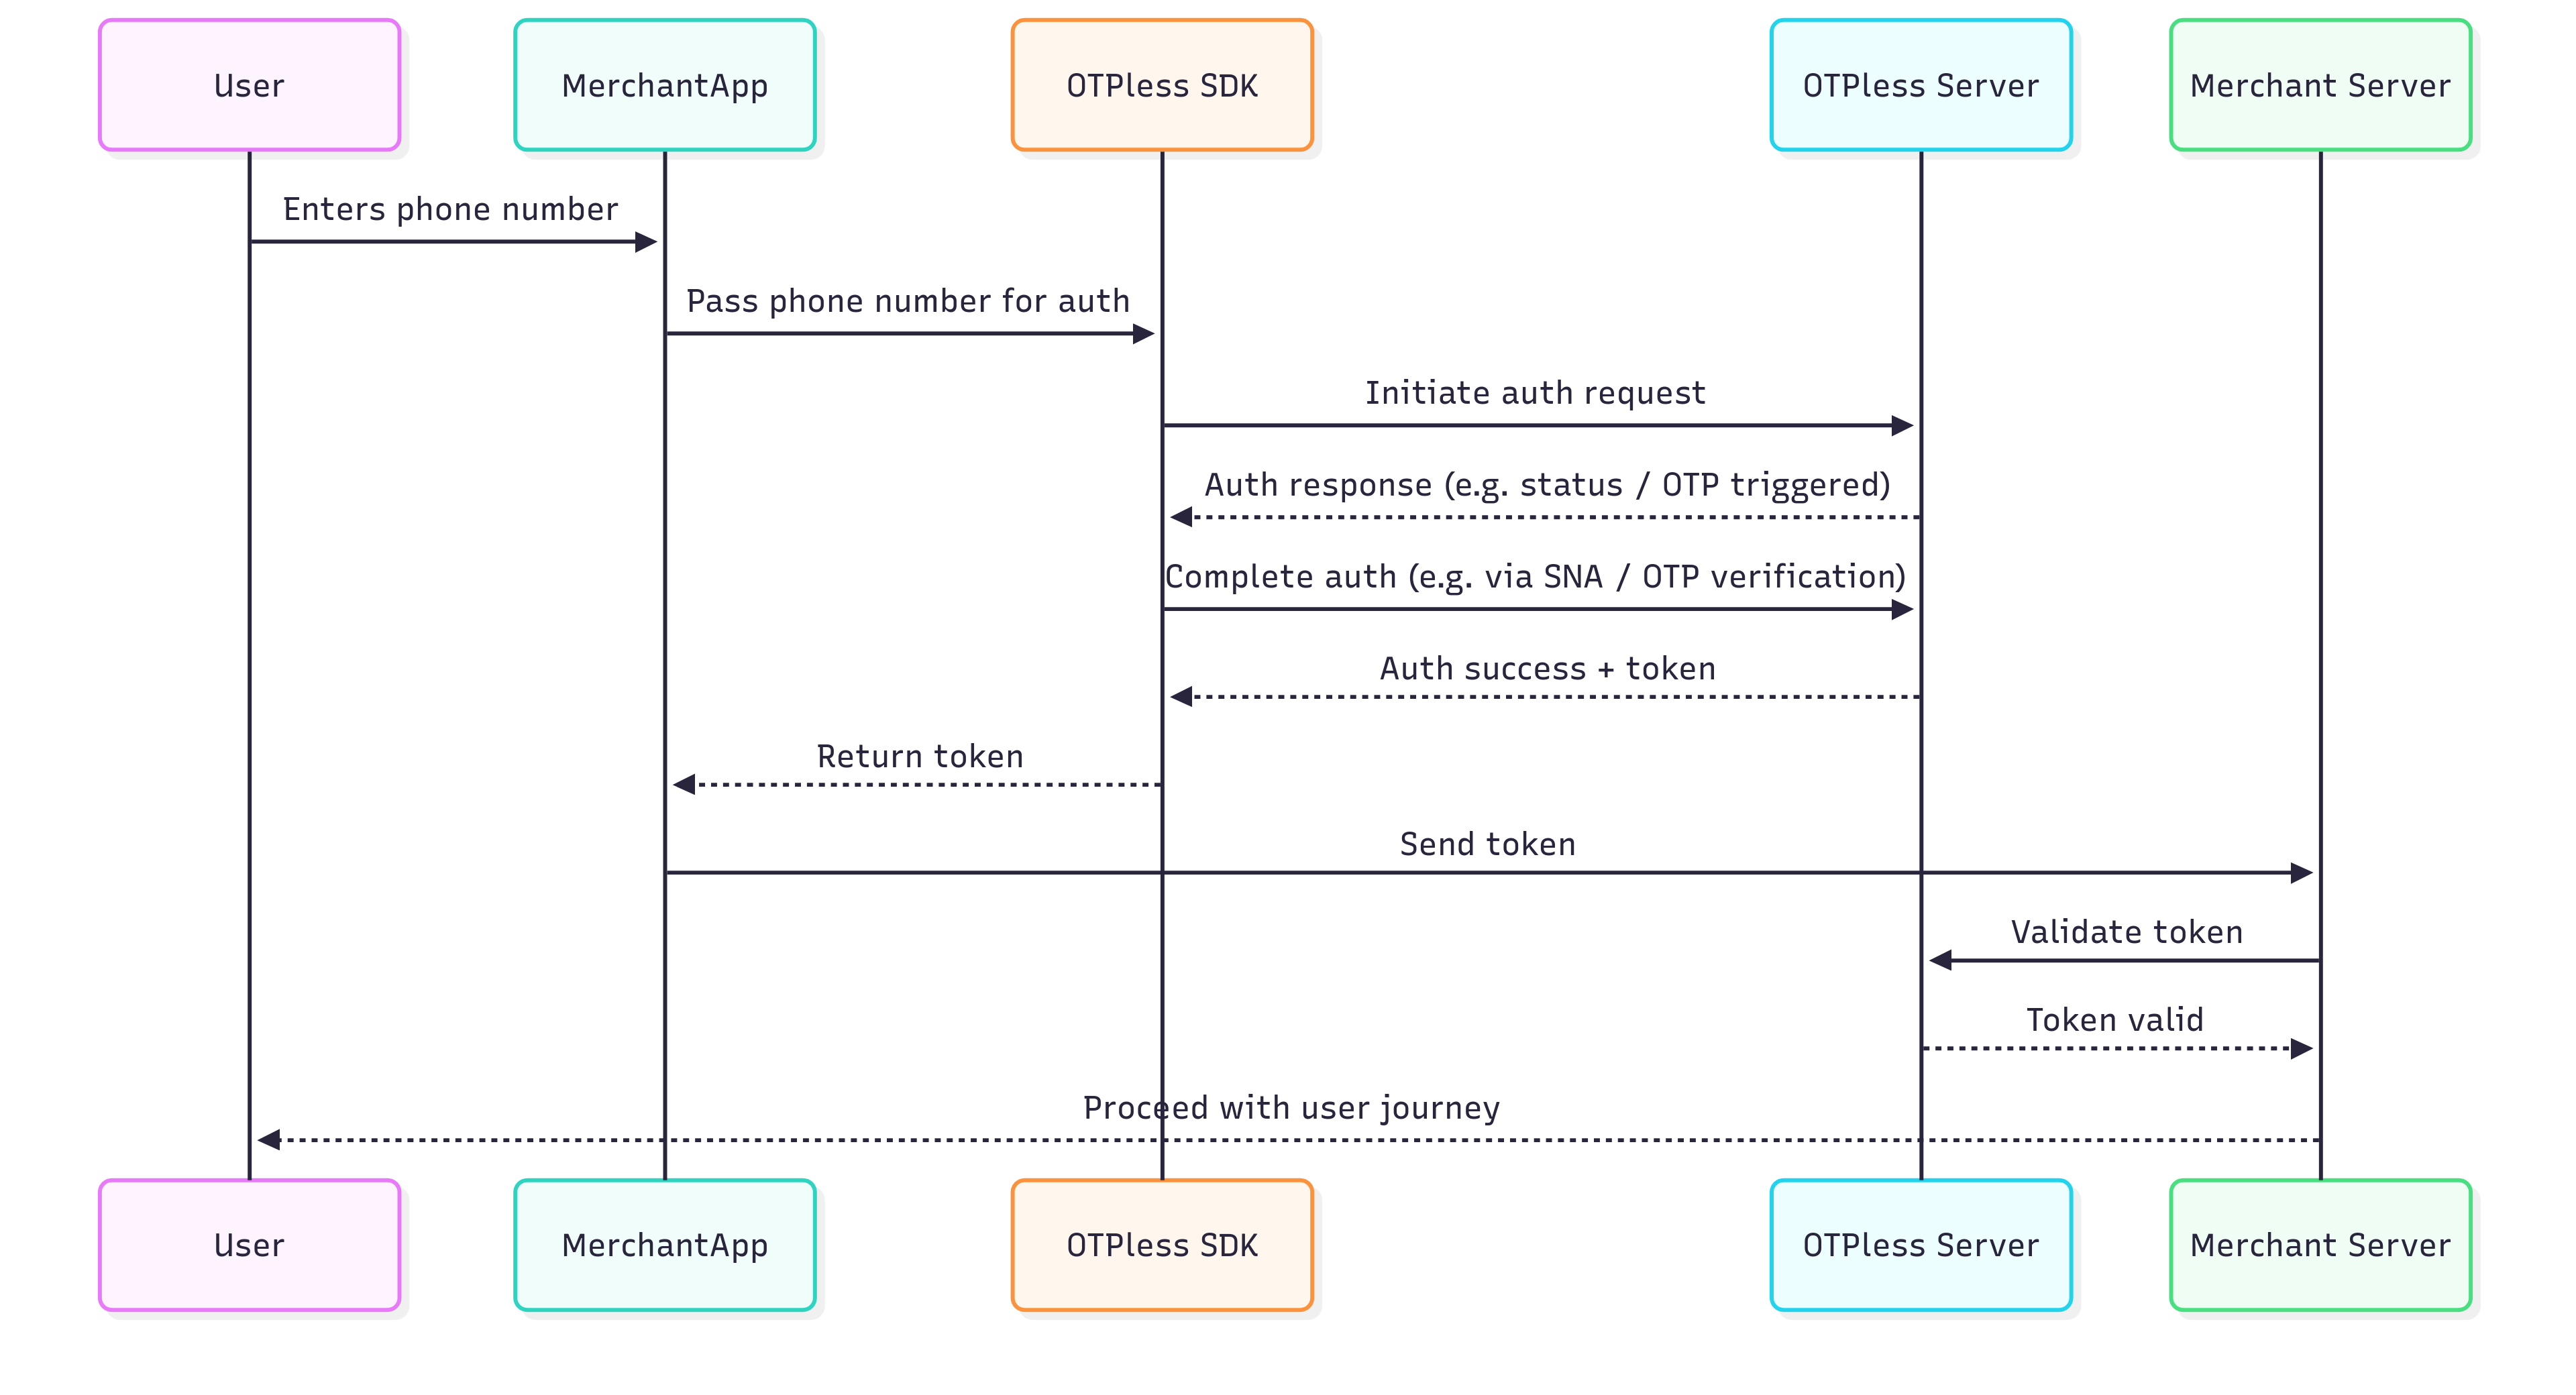
Integration Steps
Step 1: Add SDK Dependency
First, let’s add the OTPLESS SDK to your project. Update your app’sbuild.gradle file by adding the following dependency:
implementation ("io.github.otpless-tech:otpless-headless-sdk:latest_version")
Please check the latest version of the SDK here.
Make sure to synchronize your Gradle project to fetch the dependency.
Step 2: Update AndroidManifest.xml
Add this intent filter to your LoginActivity inAndroidManifest.xml:
This step is only needed for Magic Link. Smart Auth integration do not require this manifest intent-filter.
<intent-filter>
    <action android:name="android.intent.action.VIEW" />
    <category android:name="android.intent.category.BROWSABLE" />
    <category android:name="android.intent.category.DEFAULT" />
    <data
        android:scheme="otpless.your_appid_in_lowercase"
        android:host="otpless" />
</intent-filter>
Replace
YOUR_APP_ID with your actual App
ID provided in
your OTPLESS dashboard.
🔍 Example: If your App ID is “AcmeApp123”, scheme becomes otpless.acmeapp123
Additionally, ensure your activity is set to singleTop launch mode and that the exported attribute is true:
This step is only needed for Magic Link. Smart Auth integration do not require this manifest intent-filter.
android:launchMode="singleTop"
android:exported="true"
Smart Authentication (SNA) Setup
- Make sure that Silent Network Authentication is enabled on the OTPLESS dashboard.
- Once you have successfully integrated OTPLESS Android SDK in your application, you only have to add the following line in your app’s
AndroidManifestfile in the<application>tag:
Learn more about Silent Network Authentication.
android:networkSecurityConfig="@xml/otpless_network_security_config"
Step 3: Add SDK Initialization
ImportOtplessSDK in your LoginActivity.ktfile:
import com.otpless.v2.android.sdk.main.OtplessSDK;
LoginActivity or LoginFragment depending upon your application architecture.
In case of:
- LoginActivity - Initialise the SDK in the
onCreate()function - LoginFragment - Initialise the SDK in the
onViewCreated()function.
lifecycleScope.launch(Dispatchers.IO) {
    OtplessSDK.initialize(APP_ID, this@LoginActivity, callback = this@LoginActivity::onOtplessResponse)
}
// Calling Kotlin `suspend` functions from Java is a bit tricky.
// Create a Kotlin `object` wrapper that calls the suspend APIs internally and exposes
// Java-friendly methods (e.g., returning `CompletableFuture`). Then call these from Java.
//
// Example:
//
/**
object OtplessManager {

    fun initOtpless(appId: String, activity: Activity, callback: (OtplessResponse) -> Unit): CompletableFuture<Unit> =
        GlobalScope.future { OtplessSDK.initialize(appId, activity, callback = callback) }

    fun startOtpless(otplessRequest: OtplessRequest, callback: (OtplessResponse) -> Unit): CompletableFuture<Unit> =
        GlobalScope.future { OtplessSDK.start(otplessRequest, callback) }
}
*/

OtplessManager.INSTANCE.initOtpless(APP_ID, this, (response) -> {
    onOtplessResponse(response);
    return null;
}).whenComplete((unit, error) -> {
    // logs
});
Replace
YOUR_APP_ID with your actual App
ID provided in
your OTPLESS dashboard.Step 4: Handle Callback
Now, let’s implement a callback method to handle the response from the OTPLESS SDK (SDK callback flow).private fun onOtplessResponse(response: OtplessResponse) {
OtplessSDK.commit(response)
when (response.responseType) {
ResponseTypes.SDK_READY -> {
// SDK has been initialized successfully, you may enable your continue button or proceed with user authentication.
}
ResponseTypes.FAILED -> {
// Notify that the initialization failed
if (response.statusCode == 5003) {
// SDK initialization failed, please try to initialize the SDK again
}
}
ResponseTypes.INITIATE -> {
// notify that authentication has been initiated
if (response.statusCode != 200) {
handleInitiateError(response);
} else {
val authType = response.response?.optString("authType") // This is the authentication type
if (authType == "OTP") {
// Take user to OTP verification screen
} else if (authType == "SILENT_AUTH") {
// Handle Silent Authentication initiation by showing loading status for SNA flow.
}
}
}
ResponseTypes.OTP_AUTO_READ -> {
val otp = response.response?.optString("otp")
if (!otp.isNullOrBlank()) {
// Autofill the OTP in your TextField/EditText
}
}
ResponseTypes.VERIFY -> {
// notify that verification has failed.
if (response.response?.optString("authType") == "SILENT_AUTH") {
if (response.statusCode == 9106) {
// Silent Authentication and all fallback authentication methods in SmartAuth have failed.
// The transaction cannot proceed further.
// The transaction cannot proceed further. Handle the scenario to gracefully exit the authentication flow
} else {
// Silent Authentication failed. If SmartAuth is enabled, the INITIATE response will include the next available authentication method configured in the dashboard.
}
} else {
handleVerifyError(response)
}
}
ResponseTypes.DELIVERY_STATUS -> {
// This function is called when delivery is successful for your authType.
val authType = response.response?.optString("authType")
// It is the authentication type (OTP, MAGICLINK, OTP_LINK) for which the delivery status is being sent
val deliveryChannel = response.response?.optString("deliveryChannel")
// It is the delivery channel (SMS, WHATSAPP, etc) on which the authType has been delivered
}
ResponseTypes.FALLBACK_TRIGGERED -> {
// A fallback occurs when an OTP delivery attempt on one channel fails,
// and the system automatically retries via the subsequent channel selected on Otpless Dashboard.
// For example, if a merchant opts for SmartAuth with primary channal as WhatsApp and secondary channel as SMS,
// in that case, if OTP delivery on WhatsApp fails, the system will automatically retry via SMS.
// The response will contain the deliveryChannel to which the OTP has been sent.
if (response.response != null) {
val newDeliveryChannel = response.response.optString("deliveryChannel"); // This is the deliveryChannel to which the OTP has been sent
}
}
ResponseTypes.ONETAP -> {
// final response with ID token
val idToken = response.response?.optJSONObject("data")?.optString("idToken")
if (!idToken.isNullOrBlank()) {
// Process idToken and proceed.
}
// final response with token
val token = response.response?.optJSONObject("data")?.optString("token")
if (!token.isNullOrBlank()) {
// Process token and proceed.
}
}
ResponseTypes.AUTH_TERMINATED -> {
// Optional handling
// This callback is given in SNA only configuration[SNA is only channel]
// No action is required if Smart auth is fully configured
}
ResponseTypes.AUTO_FLOW_ACTION -> {
// Optional handling
// This callback is given in background auth case
// No action is required if background auth is not triggered
if (response.statusCode == 200) {
val actionType = response.response?.getString("actionType")
// 21000 = identity selected
// 21001 = dialog shown
} else {
val errorCode = response.response?.getString("errorCode")
// 12001 = user aborted the auth
// 12002 = network failure abort
}
}
}
}
private void onOtplessResponse(OtplessResponse response) {
    OtplessSDK.INSTANCE.commit(response);
    switch (response.getResponseType()) {
        case SDK_READY:
            // SDK has been initialized successfully, you may enable your continue button or proceed with user authentication.
            break;
        case FAILED:
            // Notify that the initialization failed
            if (response.getStatusCode() == 5003) {
                // SDK initialization failed, please try to initialize the SDK again
            }
            break;
        case INITIATE:
            // Notify that authentication has been initiated
            if (response.statusCode != 200) {
                handleInitiateError(response);
            } else {
                String authType = response.response != null ? response.response.optString("authType") : null; // This is the authentication type
                if (authType != null) {
                    if (authType.equals("OTP")) {
                        // Take user to OTP verification screen
                    } else if (authType.equals("SILENT_AUTH")) {
                        // Handle Silent Authentication initiation by showing loading status for SNA flow.
                    }
                }
            }
            break;
        case OTP_AUTO_READ:
            if (response.getResponse() != null) {
                String otp = response.getResponse().optString("otp");
                if (otp != null && !otp.isEmpty()) {
                    // Autofill the OTP in your TextField/EditText
                }
            }
            break;
        case VERIFY:
            // Notify that verification has failed.
            if (response.getResponse().optString("authType") == "SILENT_AUTH") {
                if (response.getStatusCode() == 9106) {
                    // Silent Authentication and all fallback authentication methods in SmartAuth have failed.
                    //  The transaction cannot proceed further. Handle the scenario to gracefully exit the authentication flow
                } else {
                    // Silent Authentication failed. If SmartAuth is enabled,
                    // the INITIATE response will include the next available authentication method configured in the dashboard.
                }
            } else {
                handleVerifyError(response); // Handle other authentication failures.
            }

            break;
        case FALLBACK_TRIGGERED:
        // A fallback occurs when an OTP delivery attempt on one channel fails,
        // and the system automatically retries via the subsequent channel selected on Otpless Dashboard.
        // For example, if a merchant opts for SmartAuth with primary channal as WhatsApp and secondary channel as SMS,
        // in that case, if OTP delivery on WhatsApp fails, the system will automatically retry via SMS.
        // The response will contain the deliveryChannel to which the OTP has been sent.
            if (response.response != null) {
                String newDeliveryChannel = response.response.optString("deliveryChannel");
                // This is the deliveryChannel to which the OTP has been sent
            }
            break;
        case DELIVERY_STATUS:
            // This function is called when delivery is successful for your authType.
            String authType = response.getResponse() != null ? response.getResponse().optString("authType") : null; // It is the authentication type (OTP, MAGICLINK, OTP_LINK) for which the delivery status is being sent
            String deliveryChannel = response.getResponse() != null ? response.getResponse().optString("deliveryChannel") : null; // It is the delivery channel (SMS, WHATSAPP, etc) on which the authType has been delivered
            break;
        case ONETAP:
            // Final response with token
            if (response.getResponse() != null) {
                JSONObject data = response.getResponse().optJSONObject("data");
                if (data != null) {
                    String token = data.optString("token");
                    if (token != null && !token.isEmpty()) {
                        // Process token and proceed.
                    }
                }
            }
            break;

            case AUTH_TERMINATED:
                // Optional handling
                // This callback is given in SNA only configuration[SNA is only channel]
                // No action is required if Smart auth is fully configured
                break;
            case AUTO_FLOW_ACTION:
                // Optional handling
                // This callback is given in background auth case
                // No action is required if background auth is not triggered
                if (response.getStatusCode() == 200) {
                    final JSONObject dataResponse = response.getResponse();
                    final String actionType;
                    if (dataResponse != null) {
                        actionType = dataResponse.optString("actionType");
                    } else {
                        actionType = "";
                    }
                    // actionType
                    // 21000 = identity selected
                    // 21001 = dialog shown
                } else {
                    final JSONObject dataResponse = response.getResponse();
                    final String errorCode;
                    if (dataResponse != null) {
                        errorCode = dataResponse.optString("errorCode");
                    } else {
                        errorCode = "";
                    }
                    // errorCode
                    // 12001 = user aborted the auth
                    // 12002 = network failure abort
                }
                break;
    }
}
Handle Initiate Error Response:
    private fun handleInitiateError(response: OtplessResponse) {
        val errorCode = response.response?.get("errorCode") as? String
        val errorMessage = response.response?.get("errorMessage") as? String

        when (errorCode) {
            "7101" -> {
                // Handle request error: Invalid parameters values or missing parameters
                println("OTPless Error: $errorMessage")
            }

            "7102" -> {
                // Handle request error: Invalid phone number
                println("OTPless Error: $errorMessage")
            }

            "7103" -> {
                // Handle request error: Invalid phone number delivery channel
                println("OTPless Error: $errorMessage")
            }

            "7104" -> {
                // Handle request error: Invalid email
                println("OTPless Error: $errorMessage")
            }

            "7105" -> {
                // Handle request error: Invalid email channel
                println("OTPless Error: $errorMessage")
            }

            "7106" -> {
                // Handle request error: Invalid phone number or email
                println("OTPless Error: $errorMessage")
            }

            "7113" -> {
                // Handle request error: Invalid expiry
                println("OTPless Error: $errorMessage")
            }

            "7116" -> {
                // Handle request error: OTP Length is invalid (4 or 6 only allowed)
                println("OTPless Error: $errorMessage")
            }

            "7121" -> {
                // Handle request error: Invalid app hash
                println("OTPless Error: $errorMessage")
            }

            "4000" -> {
                // Handle invalid request values
                println("OTPless Error: $errorMessage")
            }

            "4003" -> {
                // Handle incorrect request channel
                println("OTPless Error: $errorMessage")
            }

            "401", "7025" -> {
                // Handle unauthorized request or country not enabled
                println("OTPless Error: $errorMessage")
            }

            "7020", "7022", "7023", "7024" -> {
                // Handle rate limiting errors (Too many requests)
                println("OTPless Error: $errorMessage")
            }

            "9100", "9104", "9103" -> {
                // Handle network connectivity errors
                println("OTPless Error: $errorMessage")
            }

            else -> {
                // Handle unknown error
                println("OTPless Error: $errorMessage")
            }
        }
    }
public void handleInitiateError(OtplessResponse response) {
    String errorCode = response.getResponse() != null ? (String) response.getResponse().get("errorCode") : null;
    String errorMessage = response.getResponse() != null ? (String) response.getResponse().get("errorMessage") : null;

    if (errorCode != null) {
        switch (errorCode) {
            case "7101":
                // Handle request error: Invalid parameters values or missing parameters
                System.out.println("OTPless Error: " + errorMessage);
                break;
            case "7102":
                // Handle request error: Invalid phone number
                System.out.println("OTPless Error: " + errorMessage);
                break;
            case "7103":
                // Handle request error: Invalid phone number delivery channel
                System.out.println("OTPless Error: " + errorMessage);
                break;
            case "7104":
                // Handle request error: Invalid email
                System.out.println("OTPless Error: " + errorMessage);
                break;
            case "7105":
                // Handle request error: Invalid email channel
                System.out.println("OTPless Error: " + errorMessage);
                break;
            case "7106":
                // Handle request error: Invalid phone number or email
                System.out.println("OTPless Error: " + errorMessage);
                break;
            case "7113":
                // Handle request error: Invalid expiry
                System.out.println("OTPless Error: " + errorMessage);
                break;
            case "7116":
                // Handle request error: OTP Length is invalid (4 or 6 only allowed)
                System.out.println("OTPless Error: " + errorMessage);
                break;
            case "7121":
                // Handle request error: Invalid app hash
                System.out.println("OTPless Error: " + errorMessage);
                break;
            case "4000":
                // Handle invalid request values
                System.out.println("OTPless Error: " + errorMessage);
                break;
            case "4003":
                // Handle incorrect request channel
                System.out.println("OTPless Error: " + errorMessage);
                break;
            case "401":
            case "7025":
                // Handle unauthorized request or country not enabled
                System.out.println("OTPless Error: " + errorMessage);
                break;
            case "7020":
            case "7022":
            case "7023":
            case "7024":
                // Handle rate limiting errors (Too many requests)
                System.out.println("OTPless Error: " + errorMessage);
                break;
            case "9100":
            case "9104":
            case "9103":
                // Handle network connectivity errors
                System.out.println("OTPless Error: " + errorMessage);
                break;
            default:
                // Handle unknown error
                System.out.println("OTPless Error: " + errorMessage);
                break;
        }
    }
}
Handle Verify Response
fun handleVerifyError(response: OtplessResponse) {
        val errorCode = response.response?.get("errorCode") as? String
        val errorMessage = response.response?.get("errorMessage") as? String

        when (errorCode) {
            "7112" -> {
                // Handle request error: Empty OTP
                println("OTPless Error: $errorMessage")
            }

            "7115" -> {
                // Handle request error: OTP is already verified
                println("OTPless Error: $errorMessage")
            }

            "7118" -> {
                // Handle request error: Incorrect OTP
                println("OTPless Error: $errorMessage")
            }

            "7303" -> {
                // Handle request error: OTP expired
                println("OTPless Error: $errorMessage")
            }

            "4000" -> {
                // Handle invalid request
                println("OTPless Error: $errorMessage")
            }

            "9100", "9104", "9103" -> {
                // Handle network error:
                println("OTPless Error: $errorMessage")
            }

            else -> {
                // Handle unknown error
                println("OTPless Error: $errorMessage")
            }
        }
    }
public void handleVerifyError(OtplessResponse response) {
    String errorCode = response.getResponse() != null ? (String) response.getResponse().get("errorCode") : null;
    String errorMessage = response.getResponse() != null ? (String) response.getResponse().get("errorMessage") : null;

    if (errorCode != null) {
        switch (errorCode) {
            case "7112":
                // Handle request error: Empty OTP
                System.out.println("OTPless Error: " + errorMessage);
                break;
            case "7115":
                // Handle request error: OTP is already verified
                System.out.println("OTPless Error: " + errorMessage);
                break;
            case "7118":
                // Handle request error: Incorrect OTP
                System.out.println("OTPless Error: " + errorMessage);
                break;
            case "7303":
                // Handle request error: OTP expired
                System.out.println("OTPless Error: " + errorMessage);
                break;
            case "4000":
                // Handle invalid request
                System.out.println("OTPless Error: " + errorMessage);
                break;
            case "9100":
            case "9104":
            case "9103":
                // Handle network error:
                System.out.println("OTPless Error: " + errorMessage);
                break;
            default:
                // Handle unknown error
                System.out.println("OTPless Error: " + errorMessage);
                break;
        }
    }
}
onNewIntent()
onNewIntent overriding is only needed for Magic Link. Smart Auth integration do not require this step.
override fun onNewIntent(intent: Intent) {
    super.onNewIntent(intent)
    lifecycleScope.launch {
        OtplessSDK.onNewIntent(intent)
    }
}
// Calling Kotlin `suspend` functions from Java is a bit tricky.
// Create a Kotlin `object` wrapper that calls the suspend APIs internally and exposes
// Java-friendly methods (e.g., returning `CompletableFuture`). Then call these from Java.
//
// Example:
//
/**
object OtplessManager {
    fun initOtpless(appId: String, activity: Activity, callback: (OtplessResponse) -> Unit):
            CompletableFuture<Unit> = GlobalScope.future {
        OtplessSDK.initialize(appId, activity, callback = callback)
    }
    fun startOtpless(otplessRequest: OtplessRequest, callback: (OtplessResponse) -> Unit):
            CompletableFuture<Unit> = GlobalScope.future { OtplessSDK.start(otplessRequest, callback) }

    fun onNewIntent(intent: Intent): CompletableFuture<Unit> = GlobalScope.future {
        OtplessSDK.onNewIntent(intent)
    }
}
*/
@Override
protected void onNewIntent(Intent intent) {
    super.onNewIntent(intent);
    final CompletableFuture<Unit> future = OtplessManager.INSTANCE.onNewIntent(intent);
}
Error Codes
Checkout error codes hereResponse Objects Structure
- SDK_READY
- FAILED
- INITIATE
- OTP_AUTO_READ
- VERIFY
- ONETAP
- DELIVERY_STATUS
- FALLBACK_TRIGGERED
{
   "responseType": "SDK_READY",
   "statusCode": 200,
   "response": {
       "success": true
    },
}
 {
    "responseType": "FAILED",
    "statusCode": 5003,
    "response": {
        "errorCode": "5003",
        "errorMessage": "Failed to initialize the SDK"
    }
}
{
    "responseType": "INITIATE",
    "statusCode": 200,
    "response": {
        "requestId": "abc123xyz",
        "channel": "MOBILE_LOGIN",
        "authType": "MOBILE_LOGIN",
        "deliveryChannel": "SMS",
    }
}
{
    "responseType": "OTP_AUTO_READ",
    "statusCode": 200,
    "response": {
        "otp": "482913"
    }
}
All VERIFY response types will always return a non-200 status code.
 {
    "responseType": "VERIFY",
    "statusCode": 400,
    "response": {
        "errorCode":"7118",
        "errorMessage":"Request error: Incorrect OTP!",
        "authType":"OTP"
    }
}
{
    "responseType": "ONETAP",
    "statusCode": 200,
    "response": {
        "token": "your_token_here",
        "status": "SUCCESS",
        "userId": "userId_for_identity",
        "timestamp": "2024-07-11T12:51:42Z",
        "identities": [],
        "idToken": "jwt_token",
        "network": {},
        "deviceInfo": {},
        "sessionInfo": { },
        "firebaseInfo": {}
    }
}
{
    "responseType": "DELIVERY_STATUS",
    "statusCode": 200,
    "response": {
        "deliveryChannel": "WHATSAPP",
        "communicationDelivered": true,
        "authType": "OTP"
    }
}
{
    "responseType": "FALLBACK_TRIGGERED",
    "statusCode": 200,
    "response": {
        "requestId": "req_98765abc",
        "channel": "MOBILE_LOGIN",
        "authType": "MOBILE_LOGIN",
        "deliveryChannel": "SMS"
    }
}
Step 5: Initiate Authentication
Well done! You have completed the foundational setup of the SDK. Now, let’s move to the next step and understand how to initiate and verify different authentication modes. Choose the authentication mode you want to integrate from the options below:- Phone Auth
- Email Auth
- OAUTH
Phone Authentication 📱
Phone authentication allows users to verify their identity using their phone number. Merchants can choose from various authentication methods:
Phone authentication allows users to verify their identity using their phone number. Merchants can choose from various authentication methods:
- Silent Authentication (SNA) – Automatically verifies the user without requiring OTP or MAGICLINK.
- OTP on Desired Channel – Sends a one-time password (OTP) via SMS, WhatsApp, or another preferred channel.
- Magic Link – Sends a link that users can click to authenticate.
- SNA + OTP – Uses silent authentication first and falls back to OTP if needed.
- OTP + Magic Link – Sends both an OTP and a magic link, allowing users to authenticate via either method.
val isSdkReady = OtplessSDK.isSdkReady();
if (isSdkReady) {
    val otplessRequest = OtplessRequest()
    otplessRequest.setPhoneNumber(number = "PHONE_NUMBER", countryCode = "COUNTRY_CODE")
    lifecycleScope.launch {
        OtplessSDK.start(request = otplessRequest, callback = ::onOtplessResponse)
    }
}else{
    console.log("SDK is not ready");
    // Follow Fallback mechanism to handle the authentication flow.
}
 // Calling Kotlin `suspend` functions from Java is a bit tricky.
 // Create a Kotlin `object` wrapper that calls the suspend APIs internally and exposes
 // Java-friendly methods (e.g., returning `CompletableFuture`). Then call these from Java.
 //
 // Example:
 //
 /**
 object OtplessManager {

     fun initOtpless(appId: String, activity: Activity, callback: (OtplessResponse) -> Unit): CompletableFuture<Unit> =
         GlobalScope.future { OtplessSDK.initialize(appId, activity, callback = callback) }

     fun startOtpless(otplessRequest: OtplessRequest, callback: (OtplessResponse) -> Unit): CompletableFuture<Unit> =
         GlobalScope.future { OtplessSDK.start(otplessRequest, callback) }
 }
 */
 boolean isSdkReady = OtplessSDK.INSTANCE.isSdkReady();
 if (isSdkReady) {
     final OtplessRequest otplessRequest = new OtplessRequest();
     otplessRequest.setPhoneNumber("PHONE_NUMBER", "COUNTRY_CODE");
     final CompletableFuture<Unit> future = OtplessManager.INSTANCE.startOtpless(otplessRequest, this::onOtplessResponse);
 }else{
     console.log("SDK is not ready");
     // Follow Fallback mechanism to handle the authentication flow.
 }
Verify OTP
To verify the OTP entered by the user, use theverify method with the necessary parameters. Verifying OTP is required only in case of OTP authentication. No need to verify OTP in case of MAGICLINK. val otplessRequest = OtplessRequest()
otplessRequest.setPhoneNumber("PHONE_NUMBER", "COUNTRY_CODE")
otplessRequest.setOtp("XXXXXX")
lifecycleScope.launch {
OtplessSDK.start(otplessRequest, ::onOtplessResponse)
}
  // Calling Kotlin `suspend` functions from Java is a bit tricky.
  // Create a Kotlin `object` wrapper that calls the suspend APIs internally and exposes
  // Java-friendly methods (e.g., returning `CompletableFuture`). Then call these from Java.
  //
  // Example:
  //
  /**
  object OtplessManager {

      fun initOtpless(appId: String, activity: Activity, callback: (OtplessResponse) -> Unit): CompletableFuture<Unit> =
          GlobalScope.future { OtplessSDK.initialize(appId, activity, callback = callback) }

      fun startOtpless(otplessRequest: OtplessRequest, callback: (OtplessResponse) -> Unit): CompletableFuture<Unit> =
          GlobalScope.future { OtplessSDK.start(otplessRequest, callback) }
  }
  */
  final OtplessRequest otplessRequest = new OtplessRequest();
  otplessRequest.setPhoneNumber("PHONE_NUMBER", "COUNTRY_CODE");
  otplessRequest.setOtp("XXXXXX");
  final CompletableFuture<Unit> futurefinal CompletableFuture<Unit> future = OtplessManager.INSTANCE.startOtpless(request, (response -> {
      return null;
  }));
Email Authentication 📧
Email authentication verifies users using their email address. Merchants can choose from:
Email authentication verifies users using their email address. Merchants can choose from:
- OTP via Email – Sends a one-time password to the user’s email.
- Magic Link – Sends a clickable authentication link to the email.
- OTP + Magic Link – Provides both options for flexibility.
  val otplessRequest = OtplessRequest()
  otplessRequest.setEmail("EMAIL_INPUT")
  lifecycleScope.launch {
    OtplessSDK.start(otplessRequest, ::onOtplessResponse)
  }
// Calling Kotlin `suspend` functions from Java is a bit tricky.
// Create a Kotlin `object` wrapper that calls the suspend APIs internally and exposes
// Java-friendly methods (e.g., returning `CompletableFuture`). Then call these from Java.
//
// Example:
//
/**
object OtplessManager {

    fun initOtpless(appId: String, activity: Activity, callback: (OtplessResponse) -> Unit): CompletableFuture<Unit> =
        GlobalScope.future { OtplessSDK.initialize(appId, activity, callback = callback) }

    fun startOtpless(otplessRequest: OtplessRequest, callback: (OtplessResponse) -> Unit): CompletableFuture<Unit> =
        GlobalScope.future { OtplessSDK.start(otplessRequest, callback) }
}
*/
final OtplessRequest otplessRequest = new OtplessRequest();
otplessRequest.setEmail("EMAIL_INPUT");
OtplessSDK.INSTANCE.startAsync(otplessRequest, this::onOtplessResponse);
final CompletableFuture<Unit> futurefinal CompletableFuture<Unit> future = OtplessManager.INSTANCE.startOtpless(request, (response -> {
        return null;
}));
Verify OTP
To verify the OTP entered by the user, use theverify method with the necessary parameters. Verifying OTP is required only in case of OTP authentication. No need to verify OTP in case of MAGICLINK.val otplessRequest = OtplessRequest()
otplessRequest.setEmail("EMAIL_INPUT")
otplessRequest.setOtp("XXXXXX")
lifecycleScope.launch {
OtplessSDK.start(otplessRequest, ::onOtplessResponse)
}
// Calling Kotlin `suspend` functions from Java is a bit tricky.
// Create a Kotlin `object` wrapper that calls the suspend APIs internally and exposes
// Java-friendly methods (e.g., returning `CompletableFuture`). Then call these from Java.
//
// Example:
//
/**
object OtplessManager {

    fun initOtpless(appId: String, activity: Activity, callback: (OtplessResponse) -> Unit): CompletableFuture<Unit> =
        GlobalScope.future { OtplessSDK.initialize(appId, activity, callback = callback) }

    fun startOtpless(otplessRequest: OtplessRequest, callback: (OtplessResponse) -> Unit): CompletableFuture<Unit> =
        GlobalScope.future { OtplessSDK.start(otplessRequest, callback) }
}
*/
final OtplessRequest otplessRequest = new OtplessRequest();
otplessRequest.setEmail("EMAIL_INPUT");
otplessRequest.setOtp("XXXXXX");
final CompletableFuture<Unit> futurefinal CompletableFuture<Unit> future = OtplessManager.INSTANCE.startOtpless(request, (response -> {
        return null;
}));
OAuth Authentication 🔑
OAuth allows users to authenticate using third-party services like Google, GitHub, or WhatsApp. Instead of entering credentials manually, users can log in using their existing accounts, streamlining the authentication process.
OAuth allows users to authenticate using third-party services like Google, GitHub, or WhatsApp. Instead of entering credentials manually, users can log in using their existing accounts, streamlining the authentication process.
val request = OtplessRequest()
request.setChannelType(OtplessChannelType.SOCIAL_CHANNEL_NAME)
lifecycleScope.launch {
    OtplessSDK.start(request, ::onOtplessResponse)
}
// Calling Kotlin `suspend` functions from Java is a bit tricky.
// Create a Kotlin `object` wrapper that calls the suspend APIs internally and exposes
// Java-friendly methods (e.g., returning `CompletableFuture`). Then call these from Java.
//
// Example:
//
/**
object OtplessManager {

    fun initOtpless(appId: String, activity: Activity, callback: (OtplessResponse) -> Unit): CompletableFuture<Unit> =
        GlobalScope.future { OtplessSDK.initialize(appId, activity, callback = callback) }

    fun startOtpless(otplessRequest: OtplessRequest, callback: (OtplessResponse) -> Unit): CompletableFuture<Unit> =
        GlobalScope.future { OtplessSDK.start(otplessRequest, callback) }
}
*/
final OtplessRequest otplessRequest = new OtplessRequest();
otplessRequest.setChannelType(OtplessChannelType.SOCIAL_CHANNEL_NAME);
final CompletableFuture<Unit> futurefinal CompletableFuture<Unit> future = OtplessManager.INSTANCE.startOtpless(request, (response -> {
        return null;
}));