
Requirements

  • The compileSdk version should be 35.
  • The minimum SDK version supported by the SDK is 21.

Overview

OTPless SDK accepts the user’s identity (phone number or email), authenticates through multiple channels, and returns a secure token upon success.The merchant app sends this token to its backend, which verifies it with the OTPless Server before proceeding with the user journey.
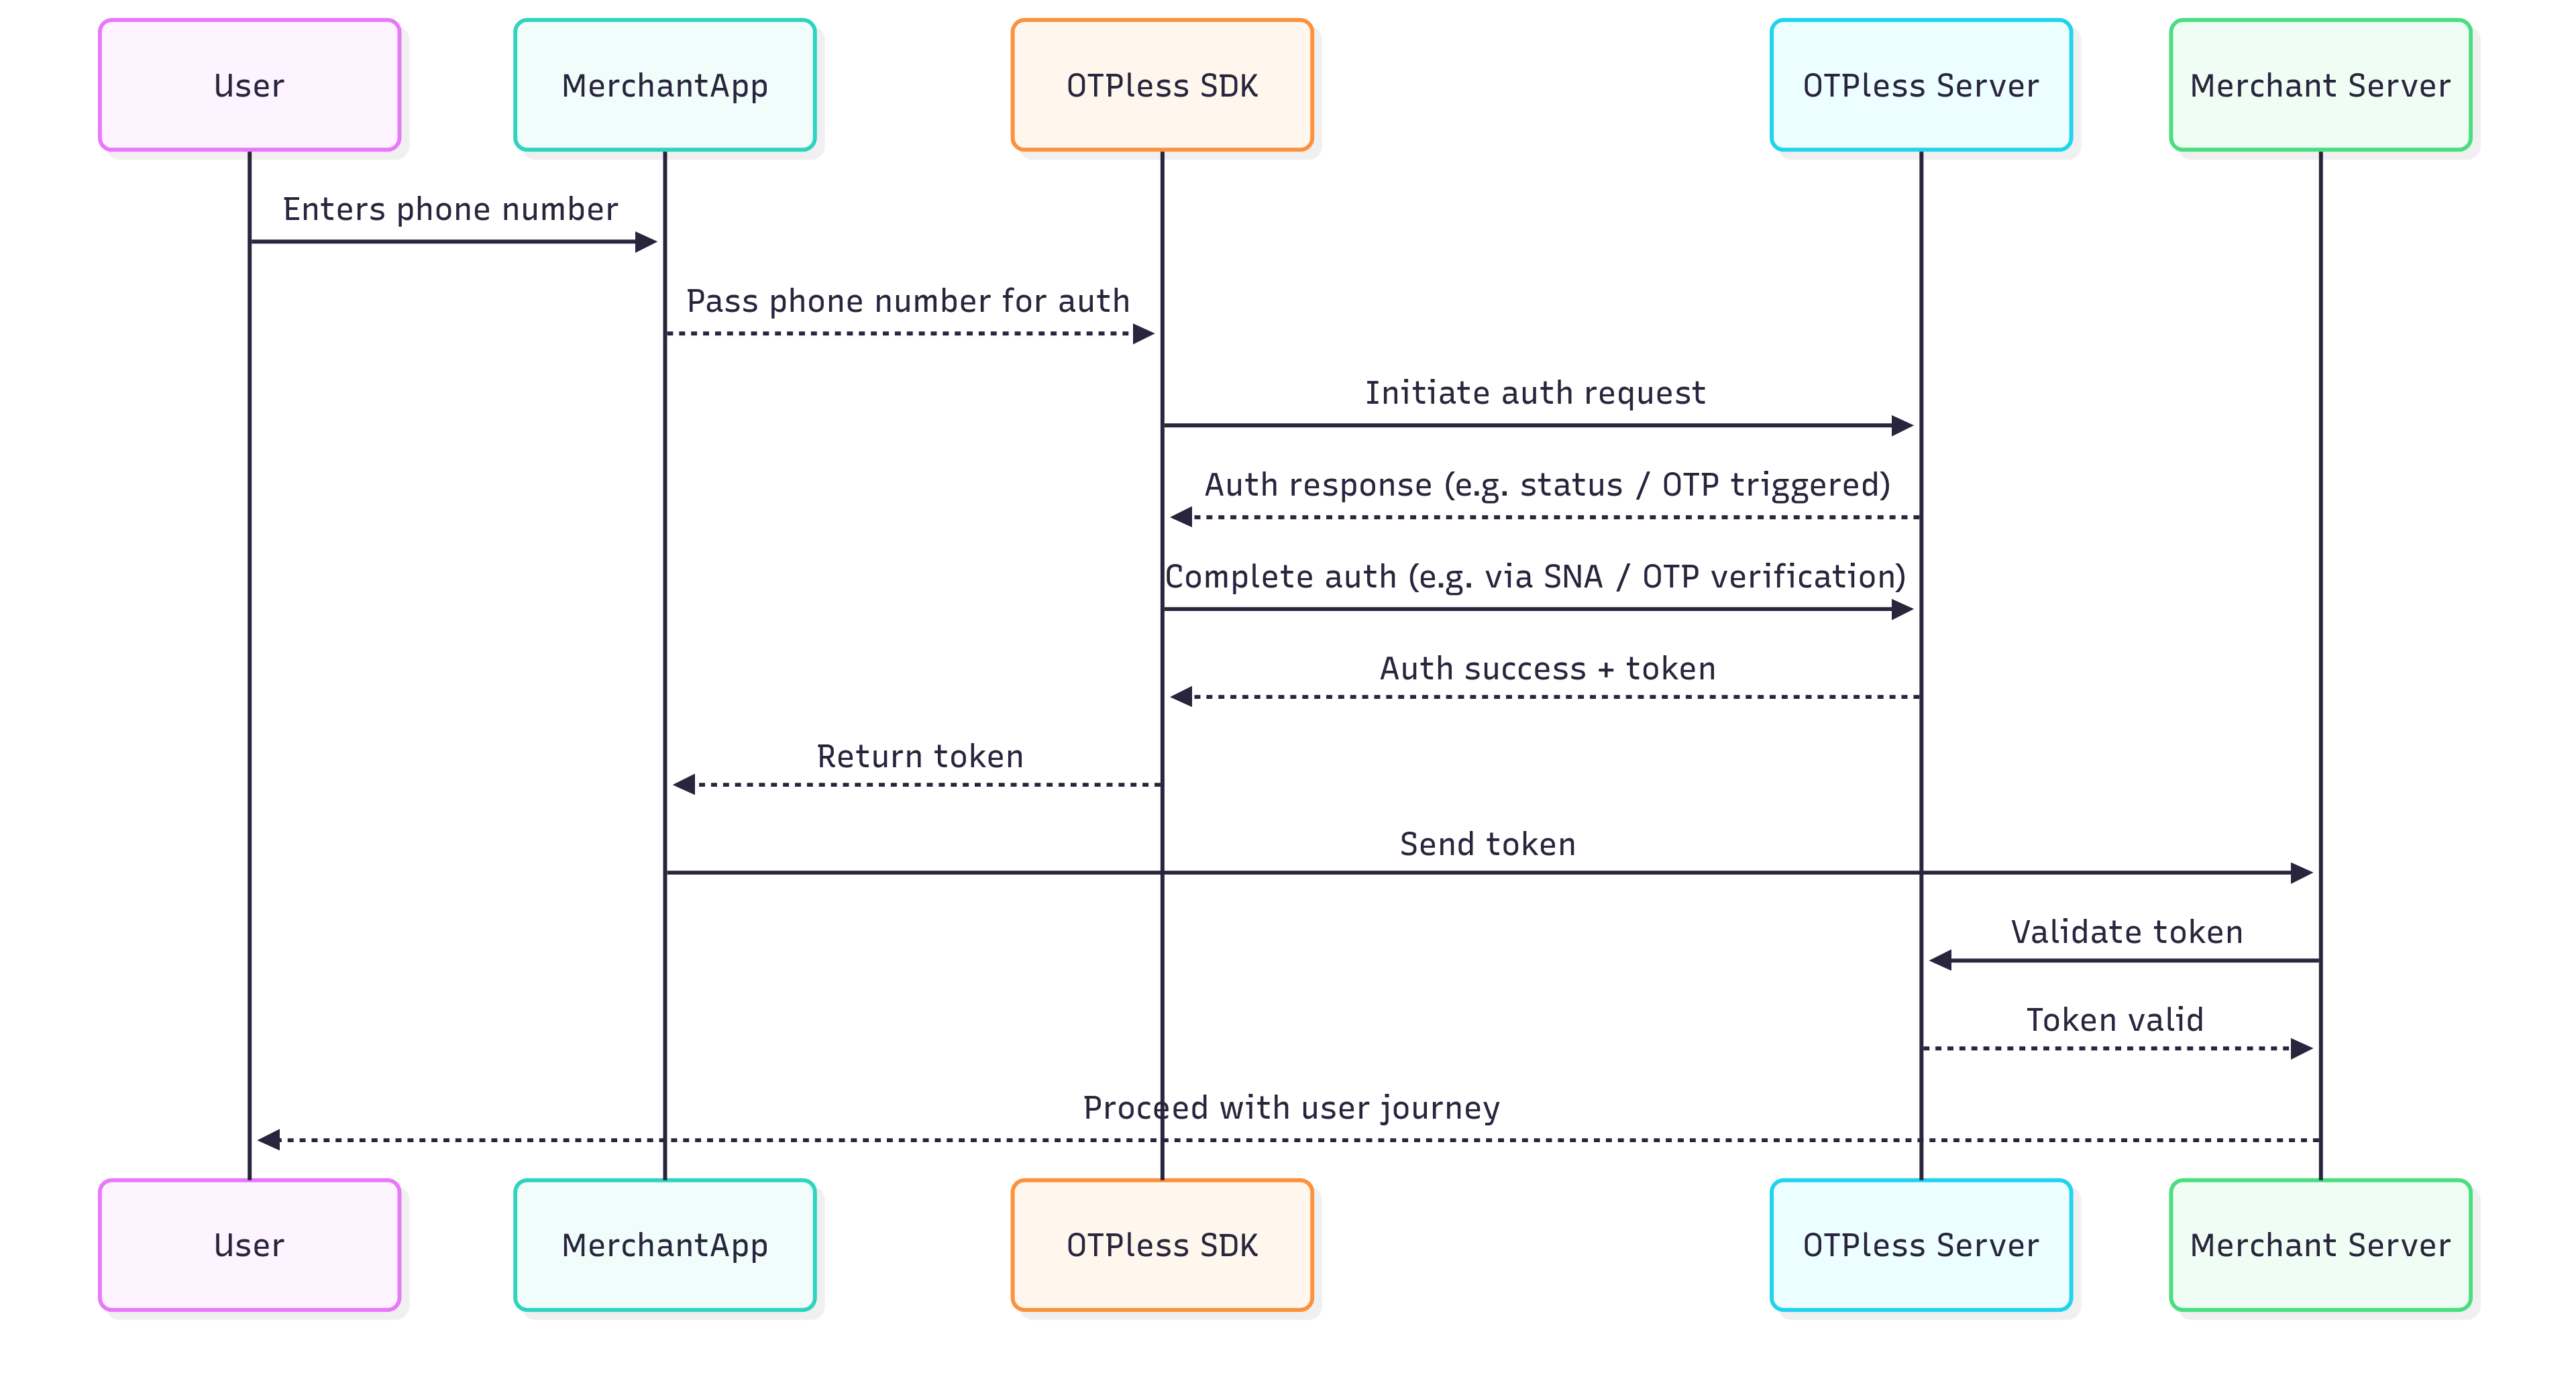
 SDK Overview Chart

Integration Steps

Step 1: Add SDK Dependency

Add the following dependency in your app’s build.gradle.
  implementation ("io.github.otpless-tech:otpless-loginpage-android:1.1.1")

Step 2: Update AndroidManifest.xml

Add this intent filter to your LoginActivity in AndroidManifest.xml:
<intent-filter>
    <action android:name="android.intent.action.VIEW" />
    <category android:name="android.intent.category.BROWSABLE" />
    <category android:name="android.intent.category.DEFAULT" />
    <data
        android:scheme="otpless.your_appid_in_lowercase"
        android:host="otpless" />
</intent-filter>
Replace YOUR_APP_ID with your actual App ID provided in your OTPLESS dashboard.
🔍 Example: If your App ID is “AcmeApp123”, scheme becomes otpless.acmeapp123
Additionally, ensure your activity is set to singleTop launch mode and that the exported attribute is true:
android:launchMode="singleTop"
android:exported="true"

Silent Network Authentication (SNA) Setup

  • Make sure that Silent Network Authentication is enabled on the OTPLESS dashboard.
  • Once you have successfully integrated OTPLESS Android SDK in your application, you only have to add the following line in your app’s AndroidManifest file in the <application> tag:
android:networkSecurityConfig="@xml/otpless_network_security_config"

Step 3: Configure your SignIn/SignUp Activity

Import the OtplessController class
Kotlin
import com.otpless.loginpage.main.OtplessController
Declare a otplessController member in your SignIn/SignUpActivity
Kotlin
private lateinit var otplessController: OtplessController
Assign the member in onCreate of your SignIn/SignUpActivity, initialize the otplessController and register the callback response method. On initialization is success callback is given in callback method.
Kotlin
otplessController = OtplessController.getInstance(this)
otplessController.initializeOtpless(OTPLESS_APP_ID){ 
   // callback
}
otplessController.registerResultCallback(this::onAuthResponse)
Override your SignIn/SignUpActivity onNewIntent and forward the new Intent to otplessController.
override fun onNewIntent(intent: Intent) {
    super.onNewIntent(intent)
    otplessController.onNewIntent(this, intent)
}

Step 4: Starting otpless

Call startOtplessWithLoginPage method from otplessController to start otpless login page.
  • Start
  • Start with Phone
  • Start with Email
Kotlin
coroutineScope.launch {
    // Prepare query parameters map for login (optional)
    otplessController.startOtplessWithLoginPage()
}
// show progress screen

Step 5: Handle auth response

Extract token from authResponse and validate token with backend apis. Backend documentation
Kotlin
import com.otpless.loginpage.model.OtplessResult

private fun onAuthResponse(authResponse: OtplessResult) {
    when(authResponse) {
        is OtplessResult.Success -> {
            // handle success case
        }
        is OtplessResult.Error -> {
            when(authResponse.errorType) {
                ErrorType.INITIATE -> {
                    when(authResponse.errorCode) {
                        10_000 -> {
                            // handle user cancelled (User clicked on back button)
                        }
                        10_001 -> {
                            // handle user cancelled (User clicked on help button)
                        }
                        10_002 -> {
                            // handle user cancelled (User clicked on phone number change button)
                        }
                        7102 -> {
                            // handle invalid phone
                        }
                        7104 -> {
                            // handle invalid email
                        }
                        9120 -> {
                            // SDK not initialized
                        }
                        9125, 5050 -> {
                            // SDK Loading error
                        }
                        
                    }
                }
                ErrorType.NETWORK -> {
                    // errorCode internet is not available 9103
                    when(authResponse.errorCode) {
                        9103 -> {
                            // handle internet error
                        }
                    }
                }
                ErrorType.VERIFY -> {
                    // handle custom error
                }
            }
        }
    }
}

Step 6: Closing otpless

When your login page is closed or login is successful, close the otplessController.
Kotlin
otplessController.closeOtpless()

Step 7: Tracking Multiple Events

You can observe all events using:
OtplessEventManager.observerEvents { eventData: OtplessEventData ->
    // Handle eventData here
}
To track and handle specific event categories, use:
OtplessEventManager.observerEvents { eventData: OtplessEventData ->
    when(eventData.category) {
        EventCategory.LOAD -> {
            // track url success loading action
        }
        EventCategory.CLICK -> {
            // track user action
        }
        EventCategory.ACTION -> {
            // track actions with metadata
        }
    }
}

Sample Event JSON Payloads

  • ACTION
  • CLICK
  • LOAD
  • INITIATE
  • VERIFY_ERROR
  • OTP_AUTO_READ
  • DELIVERY_STATUS
  • FALLBACK_TRIGGERED
{
  "event": "ACTION",
  "type": "INITIATE",
  "metaData": {
    "requestId": "abc123xyz",
    "channel": "OTP/SILENT_AUTH",
    "authType": "OTP/SILENT_AUTH",
    "deliveryChannel": "OTP/SILENT_AUTH"
  }
}

I