

Overview
OTPless SDK accepts the user’s identity (phone number or email), authenticates through multiple channels, and returns a secure token upon success.The merchant app sends this token to its backend, which verifies it with the OTPless Server before proceeding with the user journey.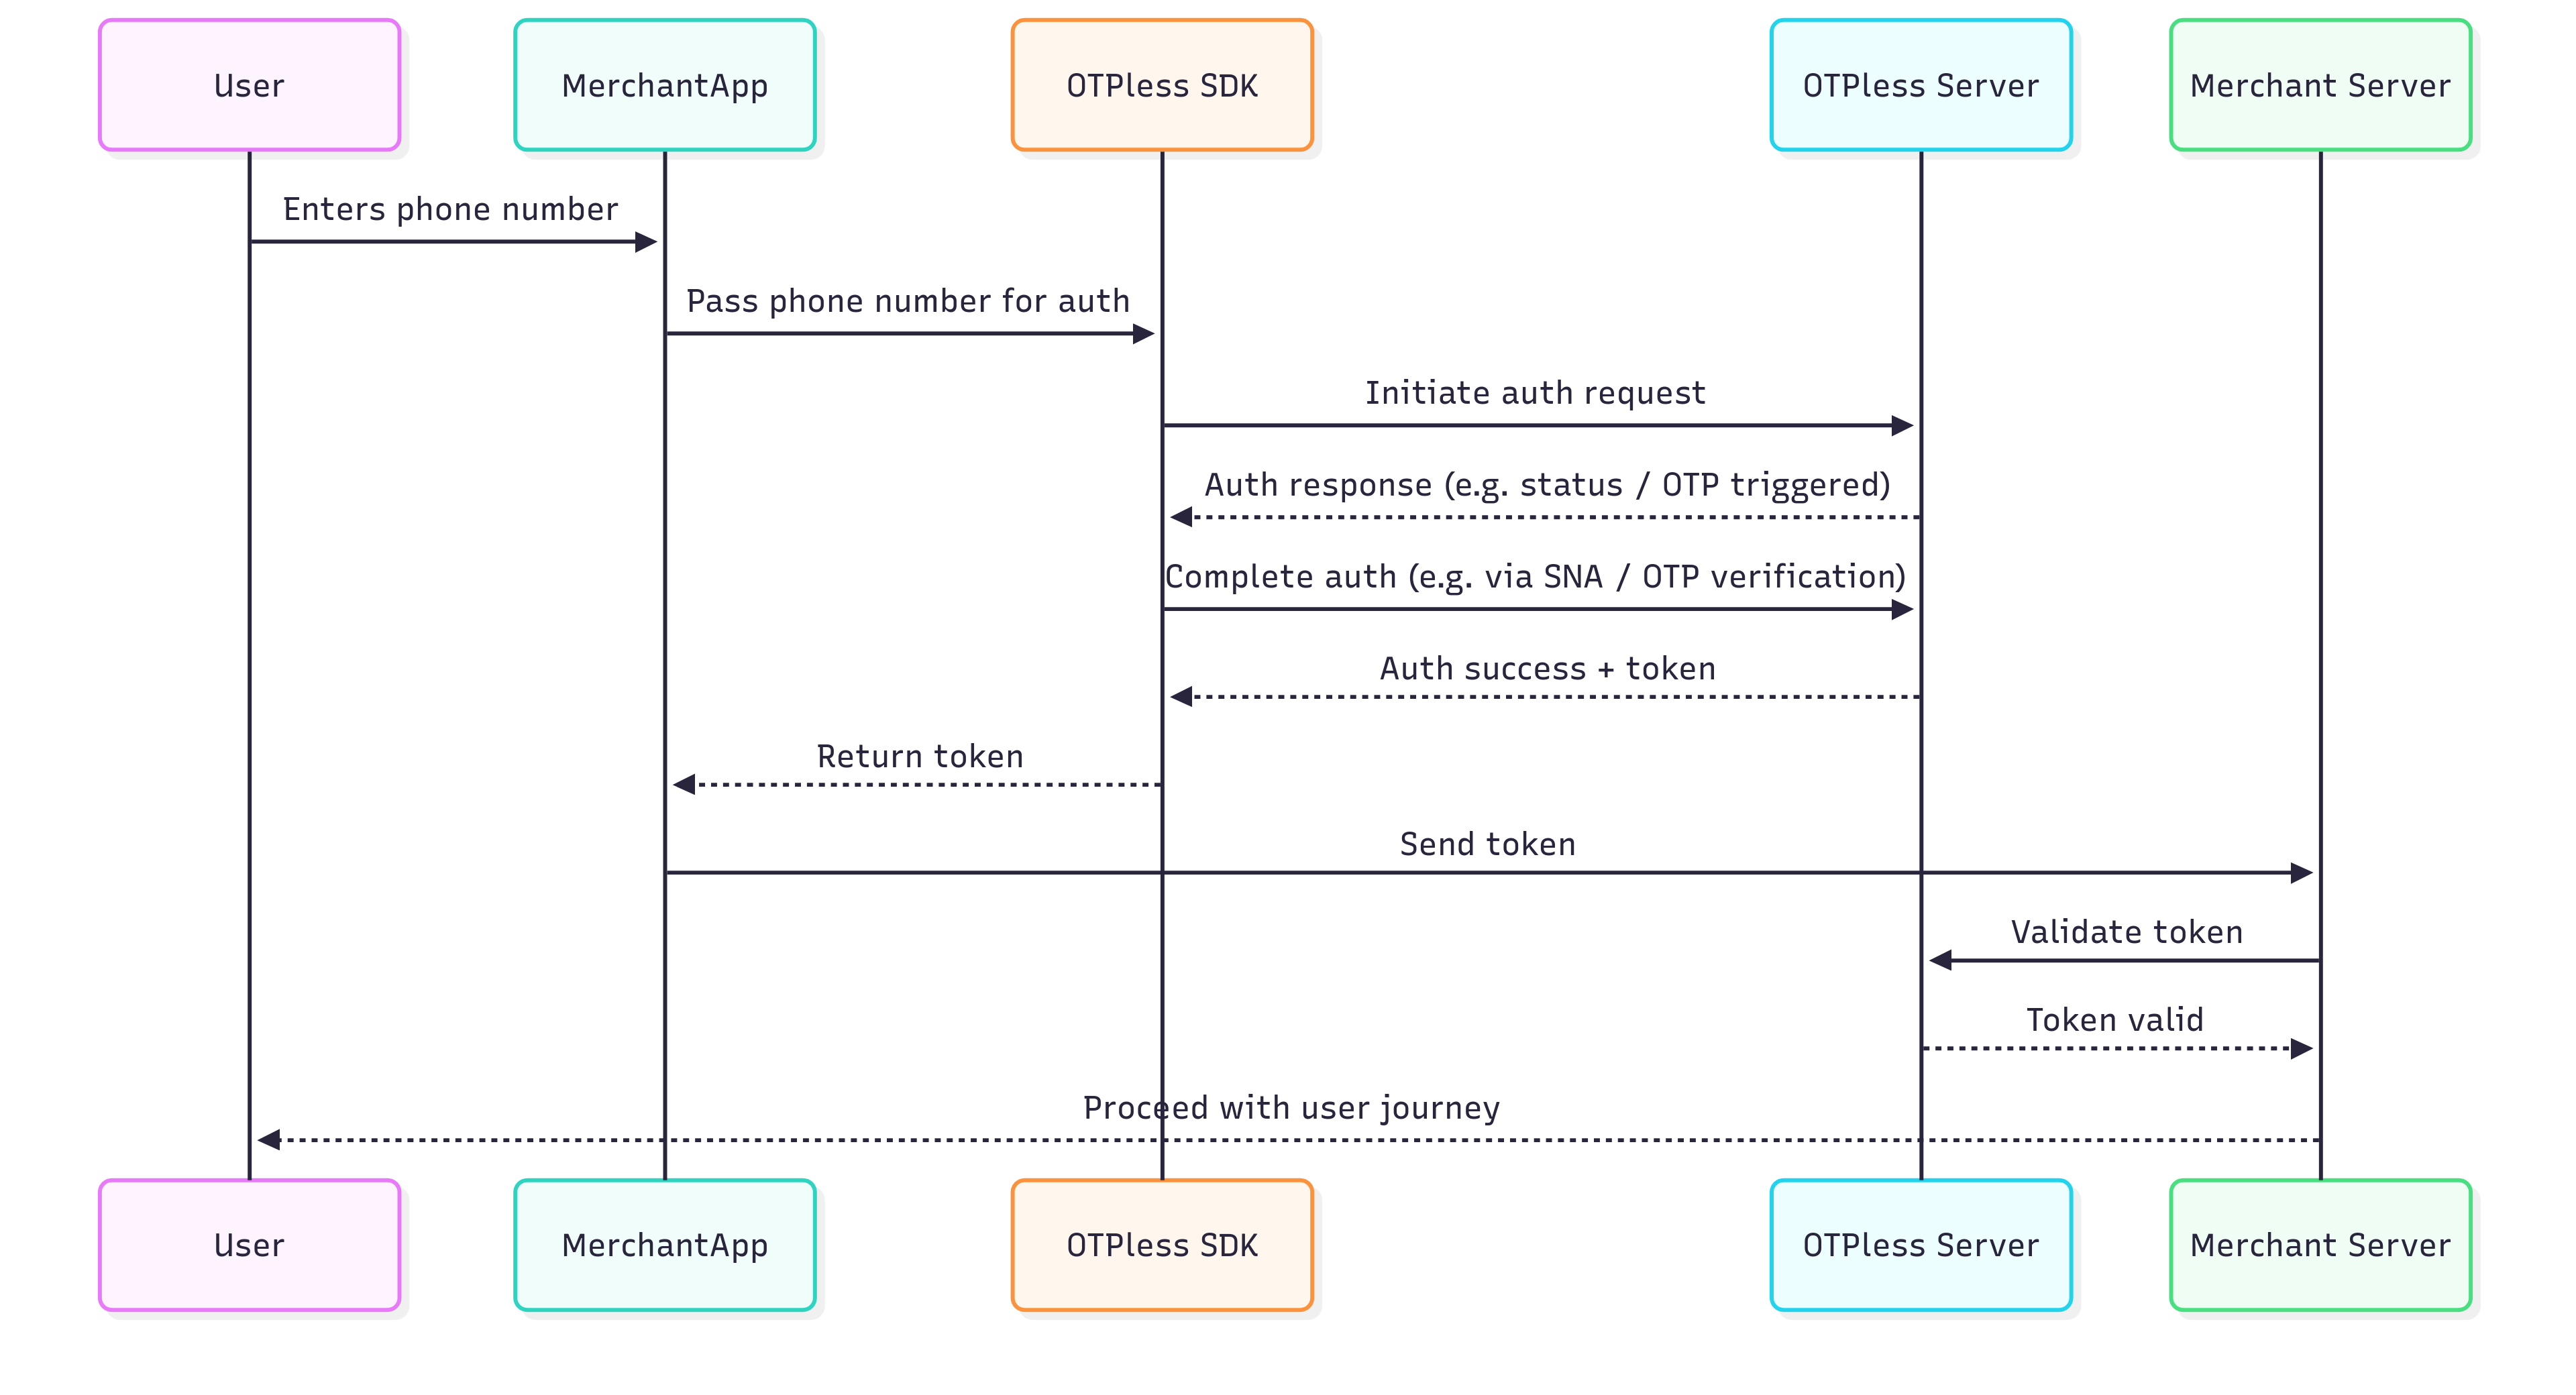
Integration Steps
Step 1: Install OTPLESS SDK Dependency
To get started, you need to install dependencies forkotlinx-serialization, kotlin-cocoapods and Otpless Android & iOS dependencies. You can do this by adding following the below mentioned steps:
Adding dependencies in gradle files:
Add thekotlinx-serialization dependency in your libs.versions.toml file:
kotlinCocoapods = { id = "org.jetbrains.kotlin.native.cocoapods", version.ref = "kotlin" }
build.gradle.kts file, add the following code:
plugins {
    alias(libs.plugins.kotlinCocoapods) apply false
}
build.gradle.kts(:composeApp) file, add the following code:
plugins {
    alias(libs.plugins.kotlinCocoapods)
    kotlin("plugin.serialization") version "2.1.10"
}
kotlinx-serialization in your build.gradle.kts(:composeApp) file:
kotlin {
    sourceSets {

        androidMain.dependencies {
            implementation("io.github.otpless-tech:otpless-headless-sdk:0.6.5")
        }
        commonMain.dependencies {
            implementation("org.jetbrains.kotlinx:kotlinx-serialization-json:1.6.0")
        }
    }

    // Cocoapods configuration: This will create a cocoapod for your iOS app.
    // So, set the description that you would want in your Podspec file.
    cocoapods {
        homepage = "Your homepage name"
        summary = "Your cocoapods summary"
        version = "1.0"
        ios.deploymentTarget = "15.3"
        podfile = project.file("../iosApp/Podfile")

        framework {
            baseName = "composeApp"
            isStatic = true
        }

        // Add the Otpless SDK dependency to the iOS framework
        pod("OtplessBM/Core") {
            version = "1.1.3"
            extraOpts += listOf("-compiler-option", "-fmodules")
        }
    }
}
Adding dependencies in Podfile:
Navigate to youriosApp directory and initialize the Podfile (if not done already) by running the following command:
cd iosApp
pod init
Podfile in the iosApp directory. Open the Podfile and add the following lines:
  # Pods for iosApp
  pod 'OtplessBM/Core', '1.1.3'
pod install
Once all the dependencies are added,
sync the gradle and run pod install to install the iOS app dependency.Step 2: Platform specific integration
- Android
- iOS
- Add intent filter inside your
android/app/src/main/AndroidManifest.xmlfile into your Main activity code block:This step is only needed for Magic Link. Smart Auth integration do not require this step.
<intent-filter>
<action android:name="android.intent.action.VIEW" />
<category android:name="android.intent.category.DEFAULT" />
<category android:name="android.intent.category.BROWSABLE" />
<data
    android:host="otpless"
    android:scheme= "otpless.YOUR_APP_ID_IN_LOWERCASE"/>
</intent-filter>
Replace
YOUR_APP_ID with your actual App
ID provided in
your OTPLESS dashboard.- Add Network Security Config inside your
android/app/src/main/AndroidManifest.xmlfile into your<application>code block (Only required if you are using the SNA feature):
android:networkSecurityConfig="@xml/otpless_network_security_config"
- Change your activity launchMode to singleTop and exported true for your Main Activity:
This step is only needed for Magic Link. Smart Auth integration do not require this step.
android:launchMode="singleTop"
android:exported="true"
- In your
MainActivity.ktfile, add the following code to handle deeplinks:This step is only needed for Magic Link. Smart Auth integration do not require this step.
import com.otpless.v2.android.sdk.main.OtplessSDK

override fun onNewIntent(intent: Intent) {
    super.onNewIntent(intent)
    lifecycleScope.launch {
        OtplessSDK.onNewIntent(intent)
    }
}
- Go to your project’s root folder in the terminal and run.
pod install
- Add the following block to your
Info.plistfile:This step is only needed for Magic Link. Smart Auth integration do not require this step.
info.plist
<key>CFBundleURLTypes</key>
<array>
    <dict>
        <key>CFBundleURLSchemes</key>
        <array>
            <string>otpless.YOUR_APP_ID_IN_LOWERCASE</string>
        </array>
        <key>CFBundleTypeRole</key>
        <string>Editor</string>
        <key>CFBundleURLName</key>
        <string>otpless</string>
    </dict>
</array>
<key>LSApplicationQueriesSchemes</key>
<array>
    <string>whatsapp</string>
    <string>otpless</string>
    <string>gootpless</string>
    <string>com.otpless.ios.app.otpless</string>
    <string>googlegmail</string>
</array>
Replace
YOUR_APP_ID with your actual App
ID provided in
your OTPLESS dashboard.- Add the following block to your
Info.plistfile only if you are using the SNA feature.
- If the
NSAppTransportSecuritykey is not already present, add the entire block below. - If the
NSAppTransportSecuritykey is already present, add the listed domains one by one underNSExceptionDomains.
info.plist
<key>NSAppTransportSecurity</key>
<dict>
    <key>NSExceptionDomains</key>
    <dict>
        <key>80.in.safr.sekuramobile.com</key>
        <dict>
            <key>NSExceptionAllowsInsecureHTTPLoads</key>
            <true/>
            <key>NSIncludesSubdomains</key>
            <true/>
        </dict>
        <key>api-csp.airtel.in</key>
        <dict>
            <key>NSExceptionAllowsInsecureHTTPLoads</key>
            <true/>
            <key>NSIncludesSubdomains</key>
            <true/>
        </dict>
        <key>in-vil.ipification.com</key>
        <dict>
            <key>NSExceptionAllowsInsecureHTTPLoads</key>
            <true/>
            <key>NSIncludesSubdomains</key>
            <true/>
        </dict>
        <key>partnerapi.jio.com</key>
        <dict>
            <key>NSExceptionAllowsInsecureHTTPLoads</key>
            <true/>
            <key>NSIncludesSubdomains</key>
            <true/>
        </dict>
    </dict>
</dict>
- Add the following code to handle deeplinks in your iOS app:
This step is only needed for Magic Link. Smart Auth integration do not require this step.
import OtplessBM

var body: some Scene {
    WindowGroup {
        ContentView()
        // Check for deep link
            .onOpenURL(perform: { url in
                if Otpless.shared.isOtplessDeeplink(url: url.absoluteURL) {
                Otpless.shared.handleDeeplink(url: url.absoluteURL)
                }
            })
        }
}
Step 3: Create expect function declarations in commonMain
In your commonMain source set, create a new file named OtplessAuthHandler.kt and add the following code:
expect fun initializeOtpless(appId: String, onOtplessResponse: (String) -> Unit, loginUri: String?)

expect fun start(otplessCMPRequest: OtplessCMPRequest)

expect fun cleanup()


data class OtplessCMPRequest(
    val phoneNumber: String? = null,
    val countryCode: String? = null,
    val email: String? = null,
    val otp: String? = null,
    val otpExpiry: String? = null,
    val otpLength: String? = null,
    val deliveryChannel: String? =  null,
    val oAuthChannel: String? = null
)
Step 4: Implement expect function declarations in androidMain and iosMain
import com.otpless.v2.android.sdk.dto.OtplessChannelType
import com.otpless.v2.android.sdk.dto.OtplessRequest
import com.otpless.v2.android.sdk.dto.OtplessResponse
import com.otpless.v2.android.sdk.main.OtplessSDK
import kotlinx.coroutines.CoroutineScope
import kotlinx.coroutines.Dispatchers
import kotlinx.coroutines.Job
import kotlinx.coroutines.launch

var job: Job? = null

actual fun initializeOtpless(appId: String, onOtplessResponse: (String) -> Unit, loginUri: String?) {
    OtplessSDK.initialize(appId, activity)
    OtplessSDK.setResponseCallback(OtplessResponseHandler::otplessResponseCallback)
    OtplessResponseHandler.setBridgeResponseHandler(onOtplessResponse)
}

actual fun start(otplessCMPRequest: OtplessCMPRequest) {
    val otplessRequest = OtplessRequest()

    if (!otplessCMPRequest.phoneNumber.isNullOrBlank() && !otplessCMPRequest.countryCode.isNullOrBlank()) {
        otplessRequest.setPhoneNumber(
            number = otplessCMPRequest.phoneNumber,
            countryCode = otplessCMPRequest.countryCode
        )
    } else if (!otplessCMPRequest.email.isNullOrBlank()) {
        otplessRequest.setEmail(
            email = otplessCMPRequest.email
        )
    } else {
        otplessRequest.setChannelType(OtplessChannelType.valueOf(otplessCMPRequest.oAuthChannel ?: "NONE"))
    }

    if (!otplessCMPRequest.deliveryChannel.isNullOrBlank()) {
        otplessRequest.setDeliveryChannel(otplessCMPRequest.deliveryChannel)
    }

    if (!otplessCMPRequest.otpExpiry.isNullOrBlank()) {
        otplessRequest.setExpiry(otplessCMPRequest.otpExpiry)
    }

    if (!otplessCMPRequest.otpLength.isNullOrBlank()) {
        otplessRequest.setOtpLength(otplessCMPRequest.otpLength)
    }

    val otp = otplessCMPRequest.otp

    if (!otp.isNullOrBlank()) {
        otplessRequest.setOtp(otp)
        job = CoroutineScope(Dispatchers.IO).launch {
            OtplessSDK.start(request = otplessRequest, OtplessResponseHandler::otplessResponseCallback)
        }
    } else {
        job?.cancel()
        job = CoroutineScope(Dispatchers.IO).launch {
            OtplessSDK.start(request = otplessRequest, OtplessResponseHandler::otplessResponseCallback)
        }
    }
}

object OtplessResponseHandler {
    private var bridgeResponseHandler: ((String) -> Unit)? = null
    fun otplessResponseCallback(otplessResponse: OtplessResponse) {
        OtplessSDK.commit(otplessResponse)
        bridgeResponseHandler?.invoke(
            convertOtplessResponseToJsonString(otplessResponse)
        )
    }

    private fun convertOtplessResponseToJsonString(otplessResponse: OtplessResponse): String {
        return """
        {
            "responseType": "${otplessResponse.responseType}",
            "response": ${otplessResponse.response?.toString() ?: "null"},
            "statusCode": ${otplessResponse.statusCode}
        }
    """.trimIndent()
    }

    fun setBridgeResponseHandler(responseHandler: (String) -> Unit) {
        bridgeResponseHandler = responseHandler
    }
}

actual fun cleanup() {
    OtplessSDK.cleanup()
}
import cocoapods.OtplessBM.Otpless
import cocoapods.OtplessBM.OtplessRequest
import cocoapods.OtplessBM.setOtplessObjcResponseDelegate
import kotlinx.cinterop.ExperimentalForeignApi
import kotlinx.coroutines.CoroutineScope
import kotlinx.coroutines.Dispatchers
import kotlinx.coroutines.IO
import kotlinx.coroutines.Job
import kotlinx.coroutines.launch

var job: Job? = null

@OptIn(ExperimentalForeignApi::class)
actual fun initializeOtpless(appId: String, onOtplessResponse: (String) -> Unit, loginUri: String?) {
    Otpless.shared().setOtplessObjcResponseDelegate(otplessResponseDelegate = { response ->
        Otpless.shared().objcCommit(response)
        if (!response.isNullOrBlank()) {
            onOtplessResponse(response)
        }
    })

    Otpless.shared().initialiseWithAppId(appId = appId, vc = MainViewController(), loginUri = null, shouldShowOtplessOneTapUI = true)
}

@OptIn(ExperimentalForeignApi::class)
actual fun start(otplessCMPRequest: OtplessCMPRequest) {
    val otplessRequest = OtplessRequest()

    if (!otplessCMPRequest.phoneNumber.isNullOrBlank() && !otplessCMPRequest.countryCode.isNullOrBlank()) {
        otplessRequest.setWithPhoneNumber(
            phoneNumber = otplessCMPRequest.phoneNumber,
            withCountryCode = otplessCMPRequest.countryCode
        )
    } else if (!otplessCMPRequest.email.isNullOrBlank()) {
        otplessRequest.setWithEmail(
            email = otplessCMPRequest.email
        )
    } else {
        otplessRequest.setWithObjcChannelType(otplessCMPRequest.oAuthChannel ?: "NONE")
    }

    if (!otplessCMPRequest.deliveryChannel.isNullOrBlank()) {
        otplessRequest.setWithDeliveryChannelForTransaction(otplessCMPRequest.deliveryChannel)
    }

    if (!otplessCMPRequest.otpExpiry.isNullOrBlank()) {
        otplessRequest.setWithOtpExpiry(otplessCMPRequest.otpExpiry)
    }

    if (!otplessCMPRequest.otpLength.isNullOrBlank()) {
        otplessRequest.setWithOtpLength(otplessCMPRequest.otpLength)
    }

    val otp = otplessCMPRequest.otp

    if (!otp.isNullOrBlank()) {
        otplessRequest.setWithOtp(otp)
        job = CoroutineScope(Dispatchers.IO).launch {
            Otpless.shared().startWithRequest(otplessRequest = otplessRequest) {
                // Leave blank because response will be received in response delegate
            }
        }
    } else {
        job?.cancel()
        job = CoroutineScope(Dispatchers.IO).launch {
            Otpless.shared().startWithRequest(otplessRequest = otplessRequest) {
                // Leave blank because response will be received in response delegate
            }
        }
    }
}

@OptIn(ExperimentalForeignApi::class)
actual fun cleanup() {
    Otpless.shared().cleanup()
}
Step 5: Initialize the Otpless SDK
In yourLoginScreen.kt file, initialize the Otpless SDK. Make sure to initialize the SDK in DisposableEffect block to free the resources consumed by Otpless once your LoginScreen.kt is destroyed.
DisposableEffect(key1 = Unit) {
    // Use key1 as Unit so that the SDK is not re-initialized on recomposition
    initializeOtpless(
        appId = "YOUR_APPID",
        onOtplessResponse = { otplessResponseString ->
            response = otplessResponseString + "\n\n" + response
            handleOtplessResponse(otplessResponseString, onOTPAutoRead = {
                otp = it
            })
        },
        loginUri = null
    )

    onDispose {
        cleanup()
    }
}
handleOtplessResponse in your LoginScreen.kt file. This function will handle the response received from the Otpless SDK.
import kotlinx.serialization.json.Json
import kotlinx.serialization.json.JsonObject
import kotlinx.serialization.json.contentOrNull
import kotlinx.serialization.json.intOrNull
import kotlinx.serialization.json.jsonObject
import kotlinx.serialization.json.jsonPrimitive

fun handleOtplessResponse(responseJsonString: String, onOTPAutoRead: (String) -> Unit) {
    val parsedElement = Json.parseToJsonElement(responseJsonString).jsonObject

    val responseType = parsedElement["responseType"]?.jsonPrimitive?.contentOrNull
    val statusCode = parsedElement["statusCode"]?.jsonPrimitive?.intOrNull
    val responseJsonObject = parsedElement["response"]?.jsonObject

    when (responseType) {
        "SDK_READY" -> {
            // SDK initialized successfully, enable continue button
            log("SDK is ready!")
        }

        "FAILED" -> {
            log("SDK initialization failed!")
            if (statusCode == 5003) {
                // SDK initialization failed, retry initializing
            } else {
                // General failure handling
            }
        }

        "INITIATE" -> {
            if (statusCode != 200) {
                if (getPlatformName().lowercase() == "android") {
                    handleInitiateErrorAndroid(responseJsonObject)
                } else {
                    handleInitiateErrorIos(responseJsonObject)
                }
            } else {
                val authType = responseJsonObject?.get("authType")?.jsonPrimitive?.contentOrNull
                when (authType) {
                    "OTP" -> {
                        log("Authentication started using OTP")
                        // Take user to OTP verification screen
                    }

                    "SILENT_AUTH" -> {
                        log("Authentication started using Silent Auth")
                        // Handle Silent Authentication initiation (show loading)
                    }
                }
            }
        }

        "OTP_AUTO_READ" -> {
            // Only applicable in Android
            val otp = responseJsonObject?.get("otp")?.jsonPrimitive?.contentOrNull
            if (!otp.isNullOrBlank()) {
                // Autofill OTP in your text field
                onOTPAutoRead(otp)
            }
        }

        "VERIFY" -> {
            val authType = responseJsonObject?.get("authType")?.jsonPrimitive?.contentOrNull
            if (authType == "SILENT_AUTH") {
                if (statusCode == 9106) {
                    // Silent Auth + fallback failed → gracefully exit auth flow
                    log("SNA + fallback failed!")
                } else {
                    log("SNA failed, trying fallback!")
                }
            } else {
                if (getPlatformName().lowercase() == "android") {
                    handleVerifyErrorAndroid(responseJsonObject)
                } else {
                    handleVerifyErrorIos(responseJsonObject)
                }
            }
        }

        "DELIVERY_STATUS" -> {
            val authType = responseJsonObject?.get("authType")?.jsonPrimitive?.contentOrNull
            val deliveryChannel = responseJsonObject?.get("deliveryChannel")?.jsonPrimitive?.contentOrNull
            // Handle delivery status (authType, deliveryChannel)
            log("DELIVERY_STATUS: authType: $authType \b deliveryChannel: $deliveryChannel")
        }

        "FALLBACK_TRIGGERED" -> {
            val newDeliveryChannel = responseJsonObject?.get("deliveryChannel")?.jsonPrimitive?.contentOrNull
            // Handle fallback deliveryChannel
            log("Fallback triggered, new delivery channel: $newDeliveryChannel")
        }

        "ONETAP" -> {
            val data = responseJsonObject?.get("data")?.jsonObject
            val token = data?.get("token")?.jsonPrimitive?.contentOrNull
            if (!token.isNullOrBlank()) {
                // Process token and proceed
                log("Token: $token")
            }
        }
    }
}
Response Objects Structure
- SDK_READY
- FAILED
- INITIATE
- OTP_AUTO_READ
- VERIFY
- ONETAP
- DELIVERY_STATUS
- FALLBACK_TRIGGERED
{
   "responseType": "SDK_READY",
   "statusCode": 200,
   "response": {
       "success": true
    },
}
 {
    "responseType": "FAILED",
    "statusCode": 5003,
    "response": {
        "errorCode": "5003",
        "errorMessage": "Failed to initialize the SDK"
    }
}
{
    "responseType": "INITIATE",
    "statusCode": 200,
    "response": {
        "requestId": "abc123xyz",
        "channel": "MOBILE_LOGIN",
        "authType": "MOBILE_LOGIN",
        "deliveryChannel": "SMS",
    }
}
{
    "responseType": "OTP_AUTO_READ",
    "statusCode": 200,
    "response": {
        "otp": "482913"
    }
}
All VERIFY response types will always return a non-200 status code.
 {
    "responseType": "VERIFY",
    "statusCode": 400,
    "response": {
        "errorCode":"7118",
        "errorMessage":"Request error: Incorrect OTP!",
        "authType":"OTP"
    }
}
{
    "responseType": "ONETAP",
    "statusCode": 200,
    "response": {
        "token": "your_token_here",
        "status": "SUCCESS",
        "userId": "userId_for_identity",
        "timestamp": "2024-07-11T12:51:42Z",
        "identities": [],
        "idToken": "jwt_token",
        "network": {},
        "deviceInfo": {},
        "sessionInfo": { },
        "firebaseInfo": {}
    }
}
{
    "responseType": "DELIVERY_STATUS",
    "statusCode": 200,
    "response": {
        "deliveryChannel": "WHATSAPP",
        "communicationDelivered": true,
        "authType": "OTP"
    }
}
{
    "responseType": "FALLBACK_TRIGGERED",
    "statusCode": 200,
    "response": {
        "requestId": "req_98765abc",
        "channel": "MOBILE_LOGIN",
        "authType": "MOBILE_LOGIN",
        "deliveryChannel": "SMS"
    }
}
Step 6: Start the Otpless SDK
In yourLoginScreen.kt file, start the Otpless SDK by calling the start function with the required parameters.
- Phone Auth
- Email Auth
- OAUTH
Phone authentication allows users to verify their identity using their phone number. Merchants can choose from various authentication methods:
- Silent Authentication (SNA) – Automatically verifies the user without requiring OTP or MAGICLINK.
- OTP on Desired Channel – Sends a one-time password (OTP) via SMS, WhatsApp, or another preferred channel.
- Magic Link – Sends a link that users can click to authenticate.
- SNA + OTP – Uses silent authentication first and falls back to OTP if needed.
- OTP + Magic Link – Sends both an OTP and a magic link, allowing users to authenticate via either method.
val otplessCMPRequest = OtplessCMPRequest(
    phoneNumber = phoneNumber,
    countryCode = countryCode
)
start(otplessCMPRequest)
Verify OTP
To verify the OTP entered by the user, use theverify method with the necessary parameters. Verifying OTP is required only in case of OTP authentication. No need to verify OTP in case of MAGICLINK.val otplessCMPRequest = OtplessCMPRequest(
otp = otp,
phoneNumber = phoneNumber,
countryCode = countryCode
)
start(otplessCMPRequest)
Email Authentication 📧
Email authentication verifies users using their email address. Merchants can choose from:
Email authentication verifies users using their email address. Merchants can choose from:
- OTP via Email – Sends a one-time password to the user’s email.
- Magic Link – Sends a clickable authentication link to the email.
- OTP + Magic Link – Provides both options for flexibility.
val otplessCMPRequest = OtplessCMPRequest(
    email = email
)
start(otplessCMPRequest)
Verify OTP
To verify the OTP entered by the user, use theverify method with the necessary parameters. Verifying OTP is required only in case of OTP authentication. No need to verify OTP in case of MAGICLINK.val otplessCMPRequest = OtplessCMPRequest(
otp = otp,
email = email
)
start(otplessCMPRequest)
OAuth Authentication 🔑
OAuth allows users to authenticate using third-party services like Google, GitHub, or WhatsApp. Instead of entering credentials manually, users can log in using their existing accounts, streamlining the authentication process.This is the list of channels you can use for OAuth login:
OAuth allows users to authenticate using third-party services like Google, GitHub, or WhatsApp. Instead of entering credentials manually, users can log in using their existing accounts, streamlining the authentication process.This is the list of channels you can use for OAuth login:
- APPLE
- GMAIL
- DISCORD
- SLACK
- MICROSOFT
- LINE
- LINEAR
- NOTION
- TWITCH
- GITHUB
- BITBUCKET
- ATLASSIAN
- GITLAB
val otplessCMPRequest = OtplessCMPRequest(
    oAuthChannel = "CHANNEL_NAME"
)
// Make sure that the CHANNEL_NAME is in uppercase
start(otplessCMPRequest)
Error Handling
The error codes for android and iOS have to be handled separately.- Checkout android error codes
- Checkout iOS error codes
- To handle all the verification/initiation error codes for android and iOS, refer to the following code:
- Android
- iOS
private fun handleInitiateErrorAndroid(responseJsonObject: JsonObject?) {
    val errorCode = responseJsonObject?.get("errorCode")?.jsonPrimitive?.contentOrNull
    val errorMessage = responseJsonObject?.get("errorMessage")?.jsonPrimitive?.contentOrNull

    when (errorCode) {
        "7101" -> log("Android OTPless Error: $errorMessage")
        "7102" -> log("Android OTPless Error: $errorMessage")
        "7103" -> log("Android OTPless Error: $errorMessage")
        "7104" -> log("Android OTPless Error: $errorMessage")
        "7105" -> log("Android OTPless Error: $errorMessage")
        "7106" -> log("Android OTPless Error: $errorMessage")
        "7113" -> log("Android OTPless Error: $errorMessage")
        "7116" -> log("Android OTPless Error: $errorMessage")
        "7121" -> log("Android OTPless Error: $errorMessage")
        "4000" -> log("Android OTPless Error: $errorMessage")
        "4003" -> log("Android OTPless Error: $errorMessage")
        "401", "7025" -> log("Android OTPless Error: $errorMessage")
        "7020", "7022", "7023", "7024" -> log("Android OTPless Error: $errorMessage")
        "500" -> log("Android OTPless Error: $errorMessage")
        "9100", "9104", "9103" -> log("Android OTPless Error: $errorMessage")
    }
}
private fun handleVerifyErrorAndroid(responseJsonObject: JsonObject?) {
    val errorCode = responseJsonObject?.get("errorCode")?.jsonPrimitive?.contentOrNull
    val errorMessage = responseJsonObject?.get("errorMessage")?.jsonPrimitive?.contentOrNull

    when (errorCode) {
        "7112" -> {
            // Handle request error: Empty OTP
            log("Android OTPless Error: $errorCode \b $errorMessage")
        }

        "7115" -> {
            // Handle request error: OTP is already verified
            log("Android OTPless Error: $errorCode \b $errorMessage")
        }

        "7118" -> {
            // Handle request error: Incorrect OTP
            log("Android OTPless Error:$errorCode \b  $errorMessage")
        }

        "7303" -> {
            // Handle request error: OTP expired
            log("Android OTPless Error: $errorCode \b $errorMessage")
        }

        "4000" -> {
            // Handle invalid request
            log("Android OTPless Error:$errorCode \b  $errorMessage")
        }

        "9100", "9104", "9103" -> {
            // Handle network error: Socket timeout exception
            log("Android OTPless Error: $errorCode \b $errorMessage")
        }

        else -> {
            // Handle unknown error
            log("Android OTPless Error:Unknown error \b  $errorMessage")
        }
    }
}
private fun handleInitiateErrorIos(responseJsonObject: JsonObject?) {
    val errorCode = responseJsonObject?.get("errorCode")?.jsonPrimitive?.contentOrNull
    val errorMessage = responseJsonObject?.get("errorMessage")?.jsonPrimitive?.contentOrNull ?: "Unknown error"

    when (errorCode) {
        "7101" -> log("iOS OTPless Error: Invalid parameters values or missing parameters - $errorMessage")
        "7102" -> log("iOS OTPless Error: Invalid phone number - $errorMessage")
        "7103" -> log("iOS OTPless Error: Invalid phone number delivery channel - $errorMessage")
        "7104" -> log("iOS OTPless Error: Invalid email - $errorMessage")
        "7105" -> log("iOS OTPless Error: Invalid email channel - $errorMessage")
        "7106" -> log("iOS OTPless Error: Invalid phone number or email - $errorMessage")
        "7113" -> log("iOS OTPless Error: Invalid expiry - $errorMessage")
        "7116" -> log("iOS OTPless Error: OTP Length is invalid (4 or 6 only allowed) - $errorMessage")
        "7121" -> log("iOS OTPless Error: Invalid app hash - $errorMessage")
        "4000" -> log("iOS OTPless Error: Invalid request values - $errorMessage")
        "4003" -> log("iOS OTPless Error: Incorrect request channel - $errorMessage")
        "401", "7025" -> log("iOS OTPless Error: Unauthorized request or country not enabled - $errorMessage")

        // Rate limiting errors
        "7020", "7022", "7023", "7024" -> log("iOS OTPless Error: Rate limiting error (Too many requests) - $errorMessage")

        // Feature not supported on older iOS versions
        "5900" -> log("iOS OTPless Error: The feature is not supported because it requires a newer iOS version - ${errorMessage.ifBlank { "The requested feature is only available on newer iOS versions." }}")

        // Network-related errors
        "9100", "9101", "9102", "9103", "9104", "9105", "9110" -> log(
            "iOS OTPless Error: Network error - " + when (errorCode) {
                "9100" -> errorMessage.ifBlank { "The request took too long to complete and was aborted." }
                "9101" -> errorMessage.ifBlank { "The connection was interrupted before the request could complete." }
                "9102" -> errorMessage.ifBlank { "The domain name could not be resolved, possibly due to network issues." }
                "9103" -> errorMessage.ifBlank { "The server is unreachable, possibly due to downtime or incorrect configurations." }
                "9104" -> errorMessage.ifBlank { "The device is not connected to the internet." }
                "9105" -> errorMessage.ifBlank { "A secure connection could not be established due to SSL/TLS issues." }
                "9110" -> errorMessage.ifBlank { "The authentication request was manually canceled by the user or the system." }
                else -> errorMessage
            }
        )

        else -> log("iOS OTPless Error: $errorMessage")
    }
}
private fun handleVerifyErrorIos(responseJsonObject: JsonObject?) {
    val errorCode = responseJsonObject?.get("errorCode")?.jsonPrimitive?.contentOrNull
    val errorMessage = responseJsonObject?.get("errorMessage")?.jsonPrimitive?.contentOrNull ?: "Unknown error"

    when (errorCode) {
        "7112" -> log("iOS OTPless Error: OTP is empty - $errorMessage")
        "7115" -> log("iOS OTPless Error: OTP already verified - $errorMessage")
        "7118" -> log("iOS OTPless Error: Incorrect OTP - $errorMessage")
        "7303" -> log("iOS OTPless Error: OTP expired - $errorMessage")
        "4000" -> log("iOS OTPless Error: Invalid request values - $errorMessage")

        // Network-related errors
        "9100", "9101", "9102", "9103", "9104", "9105", "9110" -> log(
            "iOS OTPless Error: Network error - " + when (errorCode) {
                "9100" -> errorMessage.ifBlank { "The request took too long to complete and was aborted." }
                "9101" -> errorMessage.ifBlank { "The connection was interrupted before the request could complete." }
                "9102" -> errorMessage.ifBlank { "The domain name could not be resolved, possibly due to network issues." }
                "9103" -> errorMessage.ifBlank { "The server is unreachable, possibly due to downtime or incorrect configurations." }
                "9104" -> errorMessage.ifBlank { "The device is not connected to the internet." }
                "9105" -> errorMessage.ifBlank { "A secure connection could not be established due to SSL/TLS issues." }
                "9110" -> errorMessage.ifBlank { "The authentication request was manually canceled by the user or the system." }
                else -> errorMessage
            }
        )

        else -> log("iOS OTPless Error: $errorMessage")
    }
}