> ## Documentation Index
> Fetch the complete documentation index at: https://otpless.com/docs/llms.txt
> Use this file to discover all available pages before exploring further.
# Headless
> Utilize our Headless SDK for ultimate flexibility. This guide provides detailed instructions on integrating custom UI elements with OTPLESS's backend authentication functions.
export const SampleGithubContainer = ({platform, href = '/api-reference/endpoint/verifytoken/verify-token-with-secure-data', text = 'authenticity of sign-in'}) => {
let githubLink = "https://github.com";
switch (platform.toLowerCase()) {
case "android":
githubLink = "https://github.com/devbathaniotpless/otpless-androidnative-demo";
break;
case "ios":
githubLink = "https://github.com/devbathaniotpless/otpless-iOS-demo";
break;
case "react native":
githubLink = "https://github.com/devbathaniotpless/otpless-react-native-demo";
break;
case "flutter":
githubLink = "https://github.com/devbathaniotpless/otpless-flutter-demo";
break;
case "ionic":
githubLink = "https://github.com/devbathaniotpless/otpless-ionic-demo";
break;
case "javascript":
githubLink = "https://github.com/devbathaniotpless/otpless-javascript-demo";
break;
case "vue":
githubLink = "https://github.com/devbathaniotpless/otpless-vue-demo";
break;
case "angular":
githubLink = "https://github.com/devbathaniotpless/otpless-angular-demo";
break;
case "wordpress":
githubLink = "https://github.com/devbathaniotpless/otpless-wordpress-demo";
break;
case "shopify":
githubLink = "https://github.com/devbathaniotpless/otpless-shopify-demo";
break;
case "react js":
githubLink = "https://github.com/devbathaniotpless/otpless-reactjs-demo";
break;
default:
githubLink = "https://github.com";
}
return
Learn how to securely `validate ID token` returned by OTPLESS {platform} SDK to ensure the {text} events from your backend server.
Learn how to securely `validate token` returned by OTPLESS {platform} SDK to ensure the {text} events from your backend server.
;
};
### Requirements
* iOS 13.0+
* Xcode 12.0+
* Swift 5.5+
This is the new Headless authentication SDK that is significantly faster and more robust than the previous version. This upgrade enhances **performance**, **reliability**, and **security**, ensuring a seamless authentication experience, along with a seamless integration process. We strongly recommend migrating to the new SDK for improved efficiency and better support. To migrate from the old SDK, remove the previous SDK dependency and integration and follow the below mentioned steps.
# Overview
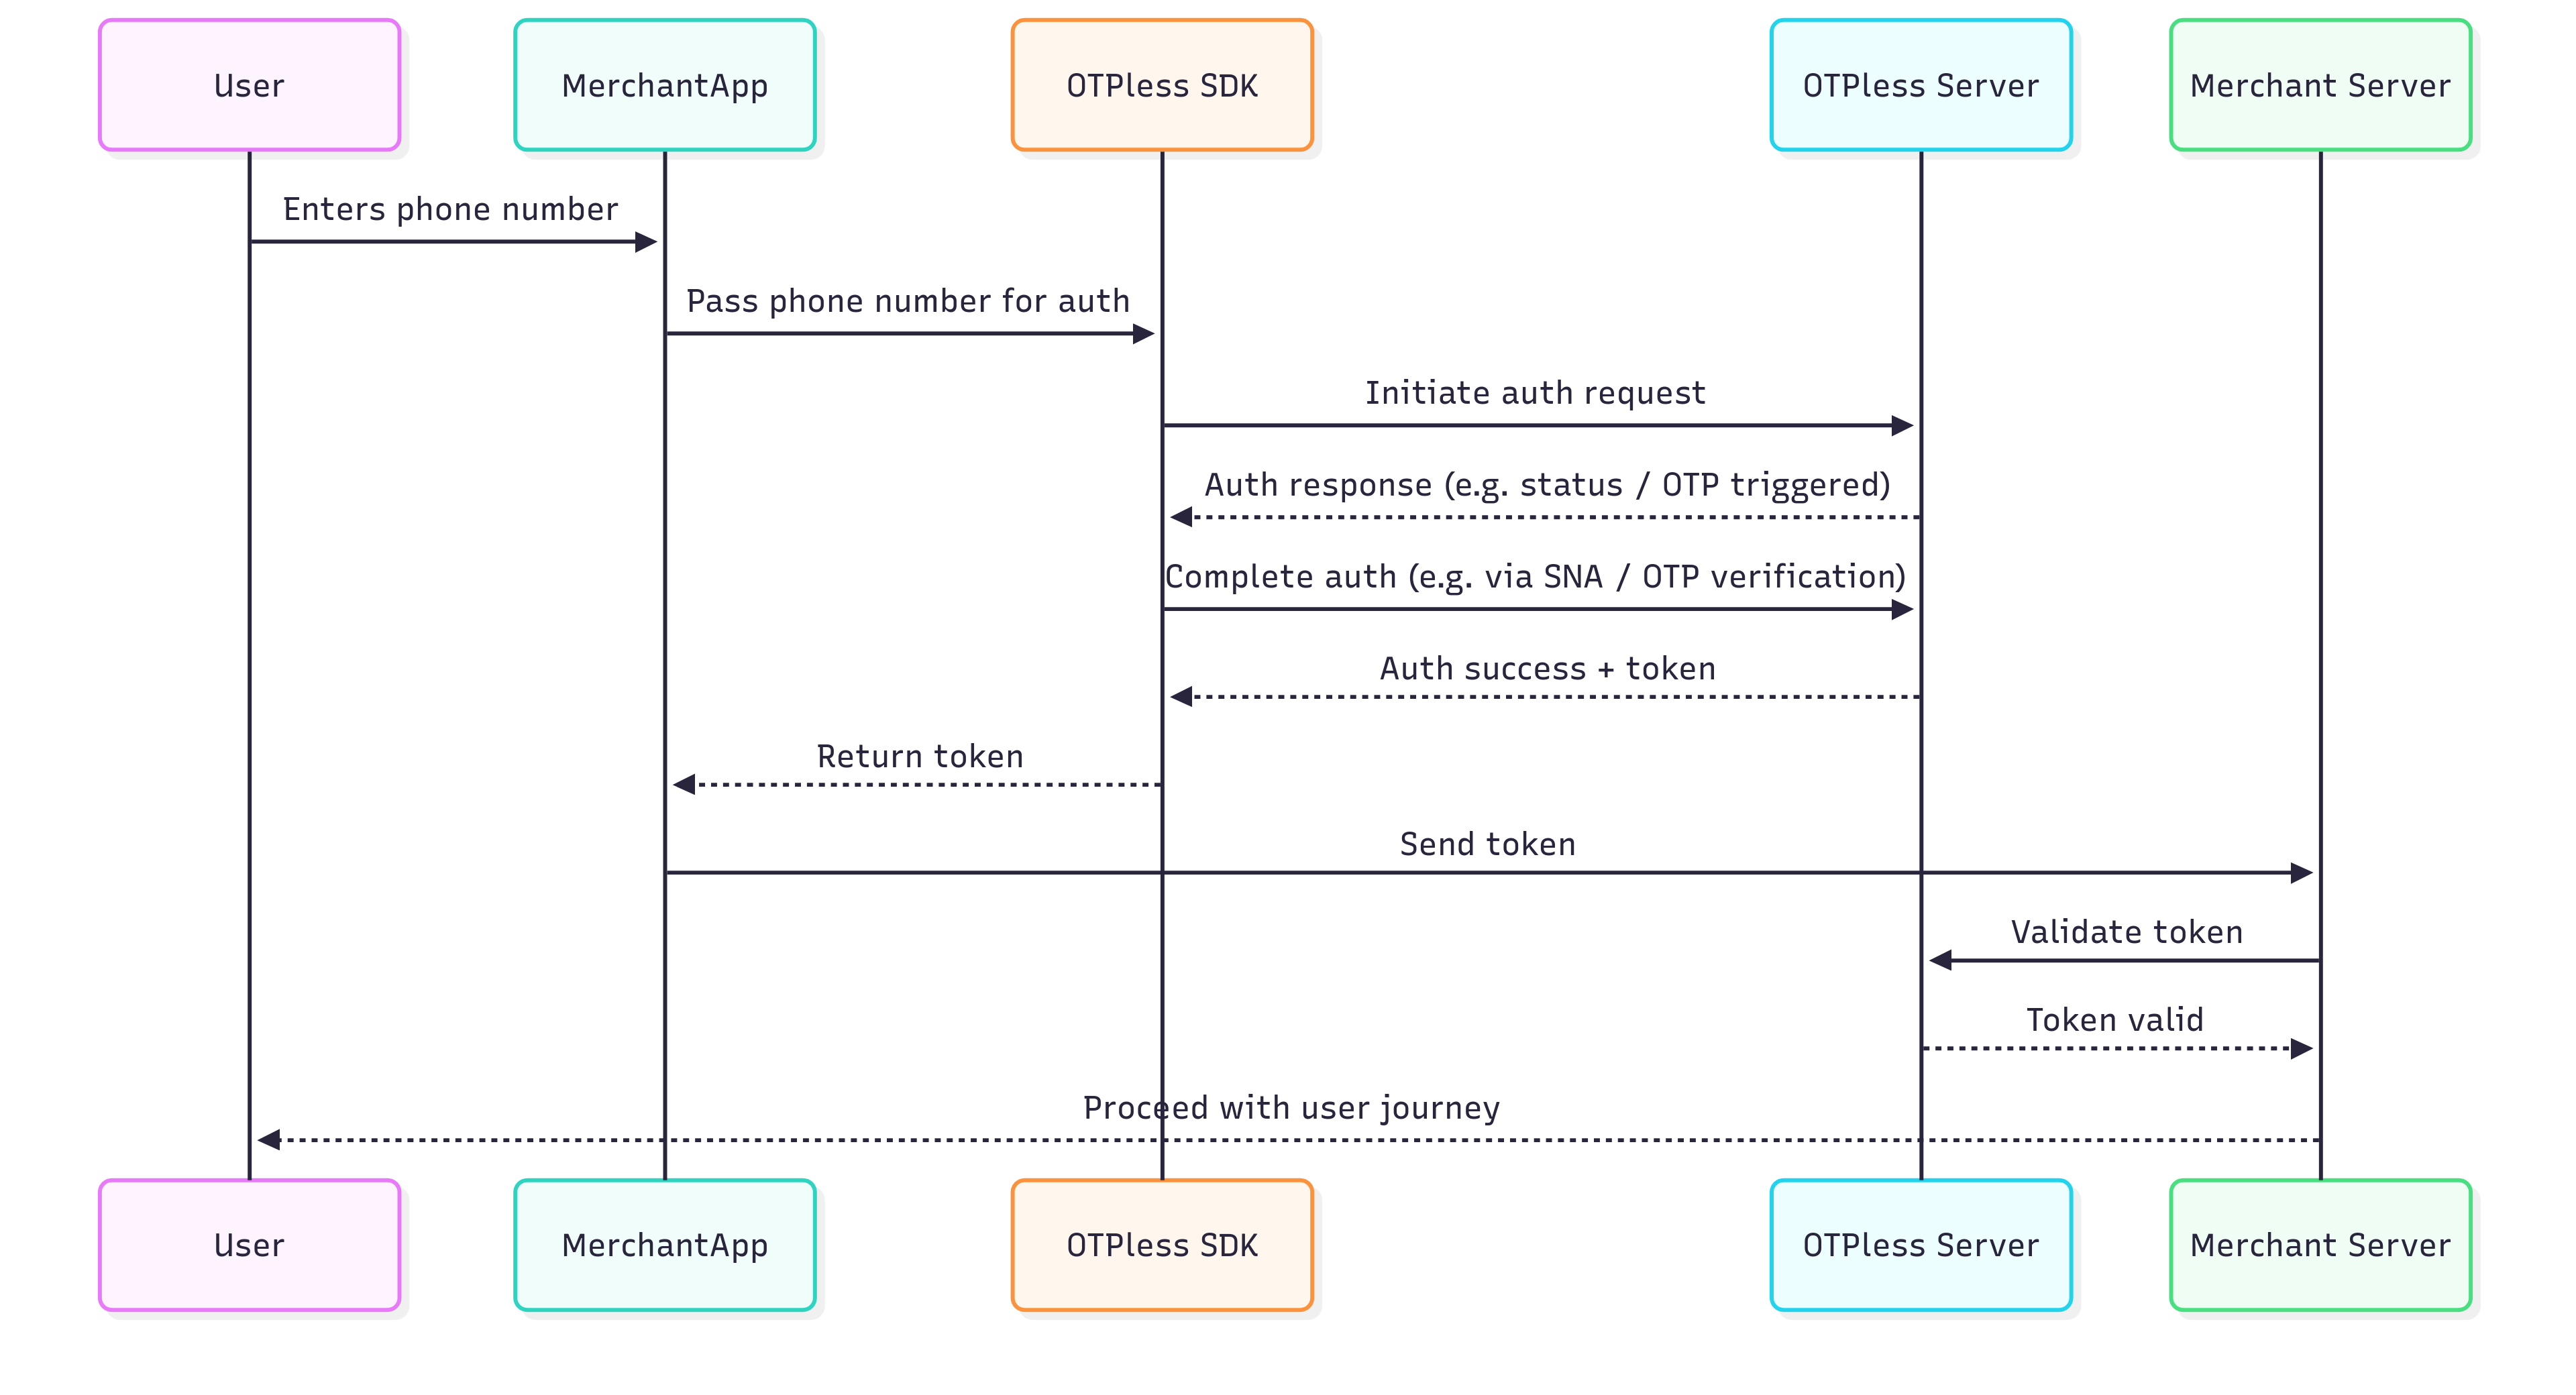
OTPless SDK accepts the user's identity (phone number or email), authenticates through multiple channels, and returns a secure token upon success.The merchant app sends this token to its backend, which verifies it with the OTPless Server before proceeding with the user journey.
 # Integration Steps
## Step 1: Add SDK Dependency
SDK can be installed via both Cocoapods and Swift Package Manager.
Please find the latest version of the SDK [here](https://github.com/otpless-tech/otpless-headless-iOS-sdk/releases).
### Cocoapods
* Open your app's project file `.xcodeproj`.
* Add the following line into the dependencies section of your project's `Podfile`:
```ruby theme={null}
pod 'OtplessBM/Core', 'latest_version'
```
Make sure to run the following commands in your root folder to fetch the
dependency.
```bash theme={null}
pod repo update
pod install
```
### Swift Package Manager
1. In Xcode, click File > Swift Packages > Add Package Dependency.
2. In the dialog that appears, enter the repository URL: [https://github.com/otpless-tech/otpless-headless-iOS-sdk.git](https://github.com/otpless-tech/otpless-headless-iOS-sdk.git).
3. Select the dependency rule as `exact version` and use the **latest version**.
## Step 2: Configure info.plist
Add the following block to your `Info.plist` file:
This step is only needed for Magic Link. Smart Auth integration do not require this step.
```xml info.plist theme={null}
CFBundleURLTypes
CFBundleURLSchemes
otpless.{{YOUR_APP_ID_IN_LOWERCASE}}
CFBundleTypeRole
Editor
CFBundleURLName
otpless
LSApplicationQueriesSchemes
whatsapp
otpless
gootpless
com.otpless.ios.app.otpless
googlegmail
```
Add the following block to your `Info.plist` file only if you are using the SNA feature.
* If the `NSAppTransportSecurity` key is not already present, add the entire block below.
* If the `NSAppTransportSecurity` key is already present, add the listed domains one by one under `NSExceptionDomains`.
```xml info.plist theme={null}
NSAppTransportSecurity
NSExceptionDomains
80.in.safr.sekuramobile.com
NSExceptionAllowsInsecureHTTPLoads
NSIncludesSubdomains
api-csp.airtel.in
NSExceptionAllowsInsecureHTTPLoads
NSIncludesSubdomains
v4-api-csp.airtel.in
NSExceptionAllowsInsecureHTTPLoads
NSIncludesSubdomains
in-vil.ipification.com
NSExceptionAllowsInsecureHTTPLoads
NSIncludesSubdomains
partnerapi.jio.com
NSExceptionAllowsInsecureHTTPLoads
NSIncludesSubdomains
```
Replace `YOUR_APP_ID` with [your actual App
ID](https://otpless.com/dashboard/customer/dev-settings/apiKeys) provided in
your OTPLESS dashboard.
## Step 3: Handle Redirection
Add the following code to your `App Delegate` to handle redirection:
This step is only needed for Magic Link. Smart Auth integration do not require this step.
```swift App Delegate theme={null}
func application(_ app: UIApplication, open url: URL, options: [UIApplication.OpenURLOptionsKey : Any] = [:]) -> Bool {
if Otpless.shared.isOtplessDeeplink(url: url.url) {
Task(priority: .userInitiated) {
await Otpless.shared.handleDeeplink(url.url)
}
}
return true
}
```
```swift Scene Delegate theme={null}
func scene(_ scene: UIScene, openURLContexts URLContexts: Set) {
for context in URLContexts {
if Otpless.shared.isOtplessDeeplink(url: url.url) {
Task(priority: .userInitiated) {
await Otpless.shared.handleDeeplink(url.url)
}
break
}
}
}
```
## Step 4: Initialize OTPLESS
Import OtplessBM in your signup/sign in file.
```swift theme={null}
import OtplessBM
```
Initialise OTPLESS in viewDidLoad() function before proceeding further.
```swift ViewController.swift theme={null}
Otpless.shared.initialise(withAppId: "YOUR_APPID", vc: self)
Otpless.shared.setResponseDelegate(self)
```
Replace `YOUR_APP_ID` with [your actual App
ID](https://otpless.com/dashboard/customer/dev-settings/apiKeys) provided in
your OTPLESS dashboard.
## Step 5: Handle Callback
Conform to `OtplessResponseDelegate` in your signup/sign in file to receive callbacks from OtplessBM [(SDK callback flow)](https://otpless.com/docs/frontend-sdks/app-sdks/ios/new/references/sdk-callback-flow).
```swift theme={null}
func onResponse(_ response: OtplessBM.OtplessResponse) {
Otpless.shared.commitOtplessResponse(response)
switch response.responseType {
case .SDK_READY:
// Notify that SDK has been initialized successfully
print("SDK has been initialized successfully, you may enable your continue button or proceed with user authentication.")
case .FAILED:
// Notify that the initialization has failed
if response.statusCode == 5003 {
print("SDK initialization failed, please try to initialize the SDK again")
}
case .INITIATE:
// Notify that authentication has been initiated
if response.statusCode == 200 {
print("Authentication initiated")
let authType = response.response?["authType"] as? String
// This is the authentication type
if authType == "OTP" {
// Take user to OTP verification screen
} else if authType == "SILENT_AUTH" {
// Handle Silent Authentication initiation by showing loading status for SNA flow.
}
} else {
handleInitiateError(response)
}
case .VERIFY:
// Notify that verification has failed
if response.response?["authType"] as? String == "SILENT_AUTH" {
if response.statusCode == 9106 {
// Silent Authentication and all fallback authentication methods in SmartAuth have failed.
// The transaction cannot proceed further.
// Handle the scenario to gracefully exit the authentication flow
} else {
// Silent Authentication failed. If SmartAuth is enabled,
// the INITIATE response will include the next available authentication
// method configured in the dashboard.
}
} else if response.response?["authType"] as? String == "OTP" {
handleVerifyError(response)
}
case .FALLBACK_TRIGGERED:
// A fallback occurs when an OTP delivery attempt on one channel fails,
// and the system automatically retries via the subsequent channel selected on Otpless Dashboard.
// For example, if a merchant opts for SmartAuth with primary channal as WhatsApp and secondary channel as SMS,
// in that case, if OTP delivery on WhatsApp fails, the system will automatically retry via SMS.
// The response will contain the deliveryChannel to which the OTP has been sent.
let newDeliveryChannel = response.response?["deliveryChannel"] as? String // This is the deliveryChannel to which the OTP has been sent
print("Fallback authentication triggered")
case .DELIVERY_STATUS:
// This function is called when delivery is successful for your authType.
let authType = response.response?["authType"] as? String
// It is the authentication type (OTP, MAGICLINK, OTP_LINK) for which the delivery status is being sent
let deliveryChannel = response.response?["deliveryChannel"] as? String
// It is the delivery channel (SMS, WHATSAPP, etc) on which the authType has been delivered
case .ONETAP:
// Final response with token
if response.statusCode == 200 {
if let data = response.response?["data"] as? [String: Any] {
let idToken = data["idToken"] as? String
let token = data["token"] as? String
if let idToken, !idToken.isEmpty {
// Process idToken and proceed to verify the idToken on your backend.
print("Received idToken: \(idToken)")
}
if let token, !token.isEmpty {
// Process token and proceed to verify the token on your backend.
print("Received token: \(token)")
}
} else {
print("Token not received")
}
} else {
print("Token verification failed")
}
}
}
```
### Handle Initiate error response:
```swift Initiate Error theme={null}
func handleInitiateError(_ response: OtplessResponse) {
guard let responseDict = response.response as? [String: Any] else { return }
let errorCode = responseDict["errorCode"] as? String
let errorMessage = responseDict["errorMessage"] as? String
switch errorCode {
case "7101":
print("OTPless Error: Invalid parameters values or missing parameters - \(errorMessage)")
case "7102":
print("OTPless Error: Invalid phone number - \(errorMessage)")
case "7103":
print("OTPless Error: Invalid phone number delivery channel - \(errorMessage)")
case "7104":
print("OTPless Error: Invalid email - \(errorMessage)")
case "7105":
print("OTPless Error: Invalid email channel - \(errorMessage)")
case "7106":
print("OTPless Error: Invalid phone number or email - \(errorMessage)")
case "7113":
print("OTPless Error: Invalid expiry - \(errorMessage)")
case "7116":
print("OTPless Error: OTP Length is invalid (4 or 6 only allowed) - \(errorMessage)")
case "7121":
print("OTPless Error: Invalid app hash - \(errorMessage)")
case "4000":
print("OTPless Error: Invalid request values - \(errorMessage)")
case "4003":
print("OTPless Error: Incorrect request channel - \(errorMessage)")
case "401", "7025":
print("OTPless Error: Unauthorized request or country not enabled - \(errorMessage)")
case "7020", "7022", "7023", "7024":
print("OTPless Error: Rate limiting error (Too many requests) - \(errorMessage)")
case "9100", "9101", "9102", "9103", "9104", "9105", "9110":
print("OTPless Error: Network error (Connectivity issue) - \(errorMessage)")
default:
print("OTPless Error: \(errorMessage)")
}
}
```
### Handle Verify error response:
```swift Verify Error theme={null}
func handleVerifyError(response: OtplessResponse) {
guard let responseDict = response.response as? [String: Any] else { return }
let errorCode = responseDict["errorCode"] as? String
let errorMessage = responseDict["errorMessage"] as? String
switch errorCode {
case "7112":
// Handle request error: Empty OTP
print("OTPless Error: \(errorMessage ?? "Unknown error")")
case "7115":
// Handle request error: OTP is already verified
print("OTPless Error: \(errorMessage ?? "Unknown error")")
case "7118":
// Handle request error: Incorrect OTP
print("OTPless Error: \(errorMessage ?? "Unknown error")")
case "7303":
// Handle request error: OTP expired
print("OTPless Error: \(errorMessage ?? "Unknown error")")
case "4000":
// Handle invalid request
print("OTPless Error: \(errorMessage ?? "Unknown error")")
// Internet-related errors
case "9100", "9101", "9102", "9103", "9104", "9105", "9110":
print("OTPless Error: Network error (Connectivity issue) - \(errorMessage)")
default:
print("OTPless Error: \(errorMessage ?? "Unknown error")")
}
}
```
### Step 6: Create a `Task`:
Create a task to initiate the authentication process based on the user's selected method.
```swift theme={null}
var otplessTask: Task? // Store the ongoing task reference
```
* Store the tasks created during Otpless authentication in the `otplessTask` variable.
* Cancel the ongoing task before creating a new task to prevent duplication of requests or sending same request twice.
## Response Objects Structure
```json theme={null}
{
"responseType": "SDK_READY",
"statusCode": 200,
"response": {
"success": true
},
}
```
```json theme={null}
{
"responseType": "FAILED",
"statusCode": 5003,
"response": {
"errorCode": "5003",
"errorMessage": "Failed to initialize the SDK"
}
}
```
```json theme={null}
{
"responseType": "INITIATE",
"statusCode": 200,
"response": {
"requestId": "abc123xyz",
"channel": "MOBILE_LOGIN",
"authType": "MOBILE_LOGIN",
"deliveryChannel": "SMS",
}
}
```
```json theme={null}
{
"responseType": "OTP_AUTO_READ",
"statusCode": 200,
"response": {
"otp": "482913"
}
}
```
All VERIFY response types will always return a non-200 status code.
```json theme={null}
{
"responseType": "VERIFY",
"statusCode": 400,
"response": {
"errorCode":"7118",
"errorMessage":"Request error: Incorrect OTP!",
"authType":"OTP"
}
}
```
```json theme={null}
{
"responseType": "ONETAP",
"statusCode": 200,
"response": {
"token": "your_token_here",
"status": "SUCCESS",
"userId": "userId_for_identity",
"timestamp": "2024-07-11T12:51:42Z",
"identities": [],
"idToken": "jwt_token",
"network": {},
"deviceInfo": {},
"sessionInfo": { },
"firebaseInfo": {}
}
}
```
```json theme={null}
{
"responseType": "DELIVERY_STATUS",
"statusCode": 200,
"response": {
"deliveryChannel": "WHATSAPP",
"communicationDelivered": true,
"authType": "OTP"
}
}
```
```json theme={null}
{
"responseType": "FALLBACK_TRIGGERED",
"statusCode": 200,
"response": {
"requestId": "req_98765abc",
"channel": "MOBILE_LOGIN",
"authType": "MOBILE_LOGIN",
"deliveryChannel": "SMS"
}
}
```
## Step 7: Initiate Authentication
Initiate the authentication process based on the user's selected method by using the `initiate` method of the SDK.
**Phone Authentication** 📱\
Phone authentication allows users to verify their identity using their phone number. Merchants can choose from various authentication methods:
* **Silent Authentication (SNA)** – Automatically verifies the user without requiring OTP or MAGICLINK.
* **OTP on Desired Channel** – Sends a one-time password (OTP) via SMS, WhatsApp, or another preferred channel.
* **Magic Link** – Sends a link that users can click to authenticate.
* **SNA + OTP** – Uses silent authentication first and falls back to OTP if needed.
* **OTP + Magic Link** – Sends both an OTP and a magic link, allowing users to authenticate via either method.
```swift Request theme={null}
otplessTask?.cancel() // Cancel any ongoing tasks to prevent request duplication
let request = OtplessRequest()
request.set(phoneNumber: "9899XXXXXX", withCountryCode: "COUNTRY_CODE")
otplessTask = Task(priority: .userInitiated) {
await Otpless.shared.start(withRequest: request)
}
```
```json Response theme={null}
{
"statusCode": 200,
"success": true,
"response": {
"channel": "PHONE",
"deliveryChannel": "WHATSAPP",
"authType": "OTP",
"requestId": "xxxxxxxxxxxxxxxx"
}
}
```
### Verify OTP
To verify the OTP entered by the user, use the `verify` method with the necessary parameters. Verifying OTP is required only in case of `OTP` authentication. No need to verify `OTP` in case of `MAGICLINK`.
```swift Request theme={null}
let request = OtplessRequest()
request.set(phoneNumber: "9899XXXXXX", withCountryCode: "COUNTRY_CODE")
request.set(otp: otp)
Task(priority: .userInitiated) {
await Otpless.shared.start(withRequest: request)
}
```
```json Response theme={null}
{
"statusCode": 200,
"success": true,
"response": {
"verification": "COMPLETED",
"requestId": "xxxxxxxxxxxxxxxx",
"channel": "PHONE"
}
}
```
**Email Authentication** 📧\
Email authentication verifies users using their email address. Merchants can choose from:
* **OTP via Email** – Sends a one-time password to the user’s email.
* **Magic Link** – Sends a clickable authentication link to the email.
* **OTP + Magic Link** – Provides both options for flexibility.
```swift Request theme={null}
otplessTask?.cancel() // Cancel any ongoing tasks to prevent request duplication
let request = OtplessRequest()
request.set(email: "loremipsum@otpless.com")
otplessTask = Task(priority: .userInitiated) {
await Otpless.shared.start(withRequest: request)
}
```
```json Response theme={null}
{
"statusCode": 200,
"success": true,
"response": {
"channel": "EMAIL",
"deliveryChannel": "EMAIL",
"authType": "OTP",
"requestId": "xxxxxxxxxxxxxxxx"
}
}
```
### Verify OTP
To verify the OTP entered by the user, use the `verify` method with the necessary parameters. Verifying OTP is required only in case of `OTP` authentication. No need to verify `OTP` in case of `MAGICLINK`.
```swift Request theme={null}
let request = OtplessRequest()
request.set(email: "loremipsum@otpless.com")
request.set(otp: otp)
Task(priority: .userInitiated) {
await Otpless.shared.start(withRequest: request)
}
```
```json Response theme={null}
{
"statusCode": 200,
"success": true,
"response": {
"verification": "COMPLETED",
"requestId": "xxxxxxxxxxxxxxxx",
"channel": "EMAIL"
}
}
```
Replace `YOUR_APP_ID` with [your actual App
ID](https://otpless.com/dashboard/customer/dev-settings/apiKeys) provided in
your OTPLESS dashboard.
**OAuth Authentication** 🔑\
OAuth allows users to authenticate using third-party services like Google, GitHub, or WhatsApp. Instead of entering credentials manually, users can log in using their existing accounts, streamlining the authentication process.
```swift Request theme={null}
otplessTask?.cancel() // Cancel any ongoing tasks to prevent request duplication
let request = OtplessRequest()
request.set(channelType: .WHATSAPP)
otplessTask = Task(priority: .userInitiated) {
await Otpless.shared.start(withRequest: request)
}
```
```json Response theme={null}
{
"statusCode": 200,
"success": true,
"response": {
"channel": "OAUTH",
"channelType": "WHATSAPP",
"requestId": "xxxxxxxxxxxxxxxx"
}
}
```
Replace `YOUR_APP_ID` with [your actual App
ID](https://otpless.com/dashboard/customer/dev-settings/apiKeys) provided in
your OTPLESS dashboard.
## **🏁 Checkpoint**
To ensure a smooth integration process:
1. Deploy your app/website with the included OTPLESS SDK.
2. Conduct tests to verify the sign-in flow functions correctly.
3. Ensure that after a successful sign-in, the user is redirected back to your app/website and their information is correctly logged in the console.
### User Information Response Structure
The structure of the user information returned upon successful sign-in is as follows:
```json theme={null}
{
"status": "SUCCESS",
"token": "unique_token_here",
"userId": "unique_user_id_here",
"timestamp": "ISO_timestamp_here",
"identities": [
{
"identityType": "EMAIL",
"identityValue": "user@example.com",
"channel": "OAUTH",
"methods": [
"GOOGLE"
],
"name": "User Name",
"verified": true,
"verifiedAt": "ISO_timestamp_here",
"isCompanyEmail": "true"
}
],
"idToken": "jwt_token",
"network": {
"ip": "127.0.0.1",
"timezone": "Asia/Kolkata",
"ipLocation": {}
},
"deviceInfo": {},
"sessionInfo": {},
"firebaseInfo": {},
}
```
You can check out a complete sample response [`here.`](https://otpless.com/docs/frontend-sdks/references/sample-response)
## Next Steps
# Integration Steps
## Step 1: Add SDK Dependency
SDK can be installed via both Cocoapods and Swift Package Manager.
Please find the latest version of the SDK [here](https://github.com/otpless-tech/otpless-headless-iOS-sdk/releases).
### Cocoapods
* Open your app's project file `.xcodeproj`.
* Add the following line into the dependencies section of your project's `Podfile`:
```ruby theme={null}
pod 'OtplessBM/Core', 'latest_version'
```
Make sure to run the following commands in your root folder to fetch the
dependency.
```bash theme={null}
pod repo update
pod install
```
### Swift Package Manager
1. In Xcode, click File > Swift Packages > Add Package Dependency.
2. In the dialog that appears, enter the repository URL: [https://github.com/otpless-tech/otpless-headless-iOS-sdk.git](https://github.com/otpless-tech/otpless-headless-iOS-sdk.git).
3. Select the dependency rule as `exact version` and use the **latest version**.
## Step 2: Configure info.plist
Add the following block to your `Info.plist` file:
This step is only needed for Magic Link. Smart Auth integration do not require this step.
```xml info.plist theme={null}
CFBundleURLTypes
CFBundleURLSchemes
otpless.{{YOUR_APP_ID_IN_LOWERCASE}}
CFBundleTypeRole
Editor
CFBundleURLName
otpless
LSApplicationQueriesSchemes
whatsapp
otpless
gootpless
com.otpless.ios.app.otpless
googlegmail
```
Add the following block to your `Info.plist` file only if you are using the SNA feature.
* If the `NSAppTransportSecurity` key is not already present, add the entire block below.
* If the `NSAppTransportSecurity` key is already present, add the listed domains one by one under `NSExceptionDomains`.
```xml info.plist theme={null}
NSAppTransportSecurity
NSExceptionDomains
80.in.safr.sekuramobile.com
NSExceptionAllowsInsecureHTTPLoads
NSIncludesSubdomains
api-csp.airtel.in
NSExceptionAllowsInsecureHTTPLoads
NSIncludesSubdomains
v4-api-csp.airtel.in
NSExceptionAllowsInsecureHTTPLoads
NSIncludesSubdomains
in-vil.ipification.com
NSExceptionAllowsInsecureHTTPLoads
NSIncludesSubdomains
partnerapi.jio.com
NSExceptionAllowsInsecureHTTPLoads
NSIncludesSubdomains
```
Replace `YOUR_APP_ID` with [your actual App
ID](https://otpless.com/dashboard/customer/dev-settings/apiKeys) provided in
your OTPLESS dashboard.
## Step 3: Handle Redirection
Add the following code to your `App Delegate` to handle redirection:
This step is only needed for Magic Link. Smart Auth integration do not require this step.
```swift App Delegate theme={null}
func application(_ app: UIApplication, open url: URL, options: [UIApplication.OpenURLOptionsKey : Any] = [:]) -> Bool {
if Otpless.shared.isOtplessDeeplink(url: url.url) {
Task(priority: .userInitiated) {
await Otpless.shared.handleDeeplink(url.url)
}
}
return true
}
```
```swift Scene Delegate theme={null}
func scene(_ scene: UIScene, openURLContexts URLContexts: Set) {
for context in URLContexts {
if Otpless.shared.isOtplessDeeplink(url: url.url) {
Task(priority: .userInitiated) {
await Otpless.shared.handleDeeplink(url.url)
}
break
}
}
}
```
## Step 4: Initialize OTPLESS
Import OtplessBM in your signup/sign in file.
```swift theme={null}
import OtplessBM
```
Initialise OTPLESS in viewDidLoad() function before proceeding further.
```swift ViewController.swift theme={null}
Otpless.shared.initialise(withAppId: "YOUR_APPID", vc: self)
Otpless.shared.setResponseDelegate(self)
```
Replace `YOUR_APP_ID` with [your actual App
ID](https://otpless.com/dashboard/customer/dev-settings/apiKeys) provided in
your OTPLESS dashboard.
## Step 5: Handle Callback
Conform to `OtplessResponseDelegate` in your signup/sign in file to receive callbacks from OtplessBM [(SDK callback flow)](https://otpless.com/docs/frontend-sdks/app-sdks/ios/new/references/sdk-callback-flow).
```swift theme={null}
func onResponse(_ response: OtplessBM.OtplessResponse) {
Otpless.shared.commitOtplessResponse(response)
switch response.responseType {
case .SDK_READY:
// Notify that SDK has been initialized successfully
print("SDK has been initialized successfully, you may enable your continue button or proceed with user authentication.")
case .FAILED:
// Notify that the initialization has failed
if response.statusCode == 5003 {
print("SDK initialization failed, please try to initialize the SDK again")
}
case .INITIATE:
// Notify that authentication has been initiated
if response.statusCode == 200 {
print("Authentication initiated")
let authType = response.response?["authType"] as? String
// This is the authentication type
if authType == "OTP" {
// Take user to OTP verification screen
} else if authType == "SILENT_AUTH" {
// Handle Silent Authentication initiation by showing loading status for SNA flow.
}
} else {
handleInitiateError(response)
}
case .VERIFY:
// Notify that verification has failed
if response.response?["authType"] as? String == "SILENT_AUTH" {
if response.statusCode == 9106 {
// Silent Authentication and all fallback authentication methods in SmartAuth have failed.
// The transaction cannot proceed further.
// Handle the scenario to gracefully exit the authentication flow
} else {
// Silent Authentication failed. If SmartAuth is enabled,
// the INITIATE response will include the next available authentication
// method configured in the dashboard.
}
} else if response.response?["authType"] as? String == "OTP" {
handleVerifyError(response)
}
case .FALLBACK_TRIGGERED:
// A fallback occurs when an OTP delivery attempt on one channel fails,
// and the system automatically retries via the subsequent channel selected on Otpless Dashboard.
// For example, if a merchant opts for SmartAuth with primary channal as WhatsApp and secondary channel as SMS,
// in that case, if OTP delivery on WhatsApp fails, the system will automatically retry via SMS.
// The response will contain the deliveryChannel to which the OTP has been sent.
let newDeliveryChannel = response.response?["deliveryChannel"] as? String // This is the deliveryChannel to which the OTP has been sent
print("Fallback authentication triggered")
case .DELIVERY_STATUS:
// This function is called when delivery is successful for your authType.
let authType = response.response?["authType"] as? String
// It is the authentication type (OTP, MAGICLINK, OTP_LINK) for which the delivery status is being sent
let deliveryChannel = response.response?["deliveryChannel"] as? String
// It is the delivery channel (SMS, WHATSAPP, etc) on which the authType has been delivered
case .ONETAP:
// Final response with token
if response.statusCode == 200 {
if let data = response.response?["data"] as? [String: Any] {
let idToken = data["idToken"] as? String
let token = data["token"] as? String
if let idToken, !idToken.isEmpty {
// Process idToken and proceed to verify the idToken on your backend.
print("Received idToken: \(idToken)")
}
if let token, !token.isEmpty {
// Process token and proceed to verify the token on your backend.
print("Received token: \(token)")
}
} else {
print("Token not received")
}
} else {
print("Token verification failed")
}
}
}
```
### Handle Initiate error response:
```swift Initiate Error theme={null}
func handleInitiateError(_ response: OtplessResponse) {
guard let responseDict = response.response as? [String: Any] else { return }
let errorCode = responseDict["errorCode"] as? String
let errorMessage = responseDict["errorMessage"] as? String
switch errorCode {
case "7101":
print("OTPless Error: Invalid parameters values or missing parameters - \(errorMessage)")
case "7102":
print("OTPless Error: Invalid phone number - \(errorMessage)")
case "7103":
print("OTPless Error: Invalid phone number delivery channel - \(errorMessage)")
case "7104":
print("OTPless Error: Invalid email - \(errorMessage)")
case "7105":
print("OTPless Error: Invalid email channel - \(errorMessage)")
case "7106":
print("OTPless Error: Invalid phone number or email - \(errorMessage)")
case "7113":
print("OTPless Error: Invalid expiry - \(errorMessage)")
case "7116":
print("OTPless Error: OTP Length is invalid (4 or 6 only allowed) - \(errorMessage)")
case "7121":
print("OTPless Error: Invalid app hash - \(errorMessage)")
case "4000":
print("OTPless Error: Invalid request values - \(errorMessage)")
case "4003":
print("OTPless Error: Incorrect request channel - \(errorMessage)")
case "401", "7025":
print("OTPless Error: Unauthorized request or country not enabled - \(errorMessage)")
case "7020", "7022", "7023", "7024":
print("OTPless Error: Rate limiting error (Too many requests) - \(errorMessage)")
case "9100", "9101", "9102", "9103", "9104", "9105", "9110":
print("OTPless Error: Network error (Connectivity issue) - \(errorMessage)")
default:
print("OTPless Error: \(errorMessage)")
}
}
```
### Handle Verify error response:
```swift Verify Error theme={null}
func handleVerifyError(response: OtplessResponse) {
guard let responseDict = response.response as? [String: Any] else { return }
let errorCode = responseDict["errorCode"] as? String
let errorMessage = responseDict["errorMessage"] as? String
switch errorCode {
case "7112":
// Handle request error: Empty OTP
print("OTPless Error: \(errorMessage ?? "Unknown error")")
case "7115":
// Handle request error: OTP is already verified
print("OTPless Error: \(errorMessage ?? "Unknown error")")
case "7118":
// Handle request error: Incorrect OTP
print("OTPless Error: \(errorMessage ?? "Unknown error")")
case "7303":
// Handle request error: OTP expired
print("OTPless Error: \(errorMessage ?? "Unknown error")")
case "4000":
// Handle invalid request
print("OTPless Error: \(errorMessage ?? "Unknown error")")
// Internet-related errors
case "9100", "9101", "9102", "9103", "9104", "9105", "9110":
print("OTPless Error: Network error (Connectivity issue) - \(errorMessage)")
default:
print("OTPless Error: \(errorMessage ?? "Unknown error")")
}
}
```
### Step 6: Create a `Task`:
Create a task to initiate the authentication process based on the user's selected method.
```swift theme={null}
var otplessTask: Task? // Store the ongoing task reference
```
* Store the tasks created during Otpless authentication in the `otplessTask` variable.
* Cancel the ongoing task before creating a new task to prevent duplication of requests or sending same request twice.
## Response Objects Structure
```json theme={null}
{
"responseType": "SDK_READY",
"statusCode": 200,
"response": {
"success": true
},
}
```
```json theme={null}
{
"responseType": "FAILED",
"statusCode": 5003,
"response": {
"errorCode": "5003",
"errorMessage": "Failed to initialize the SDK"
}
}
```
```json theme={null}
{
"responseType": "INITIATE",
"statusCode": 200,
"response": {
"requestId": "abc123xyz",
"channel": "MOBILE_LOGIN",
"authType": "MOBILE_LOGIN",
"deliveryChannel": "SMS",
}
}
```
```json theme={null}
{
"responseType": "OTP_AUTO_READ",
"statusCode": 200,
"response": {
"otp": "482913"
}
}
```
All VERIFY response types will always return a non-200 status code.
```json theme={null}
{
"responseType": "VERIFY",
"statusCode": 400,
"response": {
"errorCode":"7118",
"errorMessage":"Request error: Incorrect OTP!",
"authType":"OTP"
}
}
```
```json theme={null}
{
"responseType": "ONETAP",
"statusCode": 200,
"response": {
"token": "your_token_here",
"status": "SUCCESS",
"userId": "userId_for_identity",
"timestamp": "2024-07-11T12:51:42Z",
"identities": [],
"idToken": "jwt_token",
"network": {},
"deviceInfo": {},
"sessionInfo": { },
"firebaseInfo": {}
}
}
```
```json theme={null}
{
"responseType": "DELIVERY_STATUS",
"statusCode": 200,
"response": {
"deliveryChannel": "WHATSAPP",
"communicationDelivered": true,
"authType": "OTP"
}
}
```
```json theme={null}
{
"responseType": "FALLBACK_TRIGGERED",
"statusCode": 200,
"response": {
"requestId": "req_98765abc",
"channel": "MOBILE_LOGIN",
"authType": "MOBILE_LOGIN",
"deliveryChannel": "SMS"
}
}
```
## Step 7: Initiate Authentication
Initiate the authentication process based on the user's selected method by using the `initiate` method of the SDK.
**Phone Authentication** 📱\
Phone authentication allows users to verify their identity using their phone number. Merchants can choose from various authentication methods:
* **Silent Authentication (SNA)** – Automatically verifies the user without requiring OTP or MAGICLINK.
* **OTP on Desired Channel** – Sends a one-time password (OTP) via SMS, WhatsApp, or another preferred channel.
* **Magic Link** – Sends a link that users can click to authenticate.
* **SNA + OTP** – Uses silent authentication first and falls back to OTP if needed.
* **OTP + Magic Link** – Sends both an OTP and a magic link, allowing users to authenticate via either method.
```swift Request theme={null}
otplessTask?.cancel() // Cancel any ongoing tasks to prevent request duplication
let request = OtplessRequest()
request.set(phoneNumber: "9899XXXXXX", withCountryCode: "COUNTRY_CODE")
otplessTask = Task(priority: .userInitiated) {
await Otpless.shared.start(withRequest: request)
}
```
```json Response theme={null}
{
"statusCode": 200,
"success": true,
"response": {
"channel": "PHONE",
"deliveryChannel": "WHATSAPP",
"authType": "OTP",
"requestId": "xxxxxxxxxxxxxxxx"
}
}
```
### Verify OTP
To verify the OTP entered by the user, use the `verify` method with the necessary parameters. Verifying OTP is required only in case of `OTP` authentication. No need to verify `OTP` in case of `MAGICLINK`.
```swift Request theme={null}
let request = OtplessRequest()
request.set(phoneNumber: "9899XXXXXX", withCountryCode: "COUNTRY_CODE")
request.set(otp: otp)
Task(priority: .userInitiated) {
await Otpless.shared.start(withRequest: request)
}
```
```json Response theme={null}
{
"statusCode": 200,
"success": true,
"response": {
"verification": "COMPLETED",
"requestId": "xxxxxxxxxxxxxxxx",
"channel": "PHONE"
}
}
```
**Email Authentication** 📧\
Email authentication verifies users using their email address. Merchants can choose from:
* **OTP via Email** – Sends a one-time password to the user’s email.
* **Magic Link** – Sends a clickable authentication link to the email.
* **OTP + Magic Link** – Provides both options for flexibility.
```swift Request theme={null}
otplessTask?.cancel() // Cancel any ongoing tasks to prevent request duplication
let request = OtplessRequest()
request.set(email: "loremipsum@otpless.com")
otplessTask = Task(priority: .userInitiated) {
await Otpless.shared.start(withRequest: request)
}
```
```json Response theme={null}
{
"statusCode": 200,
"success": true,
"response": {
"channel": "EMAIL",
"deliveryChannel": "EMAIL",
"authType": "OTP",
"requestId": "xxxxxxxxxxxxxxxx"
}
}
```
### Verify OTP
To verify the OTP entered by the user, use the `verify` method with the necessary parameters. Verifying OTP is required only in case of `OTP` authentication. No need to verify `OTP` in case of `MAGICLINK`.
```swift Request theme={null}
let request = OtplessRequest()
request.set(email: "loremipsum@otpless.com")
request.set(otp: otp)
Task(priority: .userInitiated) {
await Otpless.shared.start(withRequest: request)
}
```
```json Response theme={null}
{
"statusCode": 200,
"success": true,
"response": {
"verification": "COMPLETED",
"requestId": "xxxxxxxxxxxxxxxx",
"channel": "EMAIL"
}
}
```
Replace `YOUR_APP_ID` with [your actual App
ID](https://otpless.com/dashboard/customer/dev-settings/apiKeys) provided in
your OTPLESS dashboard.
**OAuth Authentication** 🔑\
OAuth allows users to authenticate using third-party services like Google, GitHub, or WhatsApp. Instead of entering credentials manually, users can log in using their existing accounts, streamlining the authentication process.
```swift Request theme={null}
otplessTask?.cancel() // Cancel any ongoing tasks to prevent request duplication
let request = OtplessRequest()
request.set(channelType: .WHATSAPP)
otplessTask = Task(priority: .userInitiated) {
await Otpless.shared.start(withRequest: request)
}
```
```json Response theme={null}
{
"statusCode": 200,
"success": true,
"response": {
"channel": "OAUTH",
"channelType": "WHATSAPP",
"requestId": "xxxxxxxxxxxxxxxx"
}
}
```
Replace `YOUR_APP_ID` with [your actual App
ID](https://otpless.com/dashboard/customer/dev-settings/apiKeys) provided in
your OTPLESS dashboard.
## **🏁 Checkpoint**
To ensure a smooth integration process:
1. Deploy your app/website with the included OTPLESS SDK.
2. Conduct tests to verify the sign-in flow functions correctly.
3. Ensure that after a successful sign-in, the user is redirected back to your app/website and their information is correctly logged in the console.
### User Information Response Structure
The structure of the user information returned upon successful sign-in is as follows:
```json theme={null}
{
"status": "SUCCESS",
"token": "unique_token_here",
"userId": "unique_user_id_here",
"timestamp": "ISO_timestamp_here",
"identities": [
{
"identityType": "EMAIL",
"identityValue": "user@example.com",
"channel": "OAUTH",
"methods": [
"GOOGLE"
],
"name": "User Name",
"verified": true,
"verifiedAt": "ISO_timestamp_here",
"isCompanyEmail": "true"
}
],
"idToken": "jwt_token",
"network": {
"ip": "127.0.0.1",
"timezone": "Asia/Kolkata",
"ipLocation": {}
},
"deviceInfo": {},
"sessionInfo": {},
"firebaseInfo": {},
}
```
You can check out a complete sample response [`here.`](https://otpless.com/docs/frontend-sdks/references/sample-response)
## Next Steps