> ## Documentation Index
> Fetch the complete documentation index at: https://otpless.com/docs/llms.txt
> Use this file to discover all available pages before exploring further.
# Introduction
> Welcome to the OTPLESS Headless SDK documentation! This guide will walk you through the steps to integrate our SDK into your Android project, providing you with the flexibility to create custom UI elements for your authentication flows.
export const SampleGithubContainer = ({platform, href = '/api-reference/endpoint/verifytoken/verify-token-with-secure-data', text = 'authenticity of sign-in'}) => {
let githubLink = "https://github.com";
switch (platform.toLowerCase()) {
case "android":
githubLink = "https://github.com/devbathaniotpless/otpless-androidnative-demo";
break;
case "ios":
githubLink = "https://github.com/devbathaniotpless/otpless-iOS-demo";
break;
case "react native":
githubLink = "https://github.com/devbathaniotpless/otpless-react-native-demo";
break;
case "flutter":
githubLink = "https://github.com/devbathaniotpless/otpless-flutter-demo";
break;
case "ionic":
githubLink = "https://github.com/devbathaniotpless/otpless-ionic-demo";
break;
case "javascript":
githubLink = "https://github.com/devbathaniotpless/otpless-javascript-demo";
break;
case "vue":
githubLink = "https://github.com/devbathaniotpless/otpless-vue-demo";
break;
case "angular":
githubLink = "https://github.com/devbathaniotpless/otpless-angular-demo";
break;
case "wordpress":
githubLink = "https://github.com/devbathaniotpless/otpless-wordpress-demo";
break;
case "shopify":
githubLink = "https://github.com/devbathaniotpless/otpless-shopify-demo";
break;
case "react js":
githubLink = "https://github.com/devbathaniotpless/otpless-reactjs-demo";
break;
default:
githubLink = "https://github.com";
}
return
Learn how to securely `validate ID token` returned by OTPLESS {platform} SDK to ensure the {text} events from your backend server.
Learn how to securely `validate token` returned by OTPLESS {platform} SDK to ensure the {text} events from your backend server.
;
};
# Overview
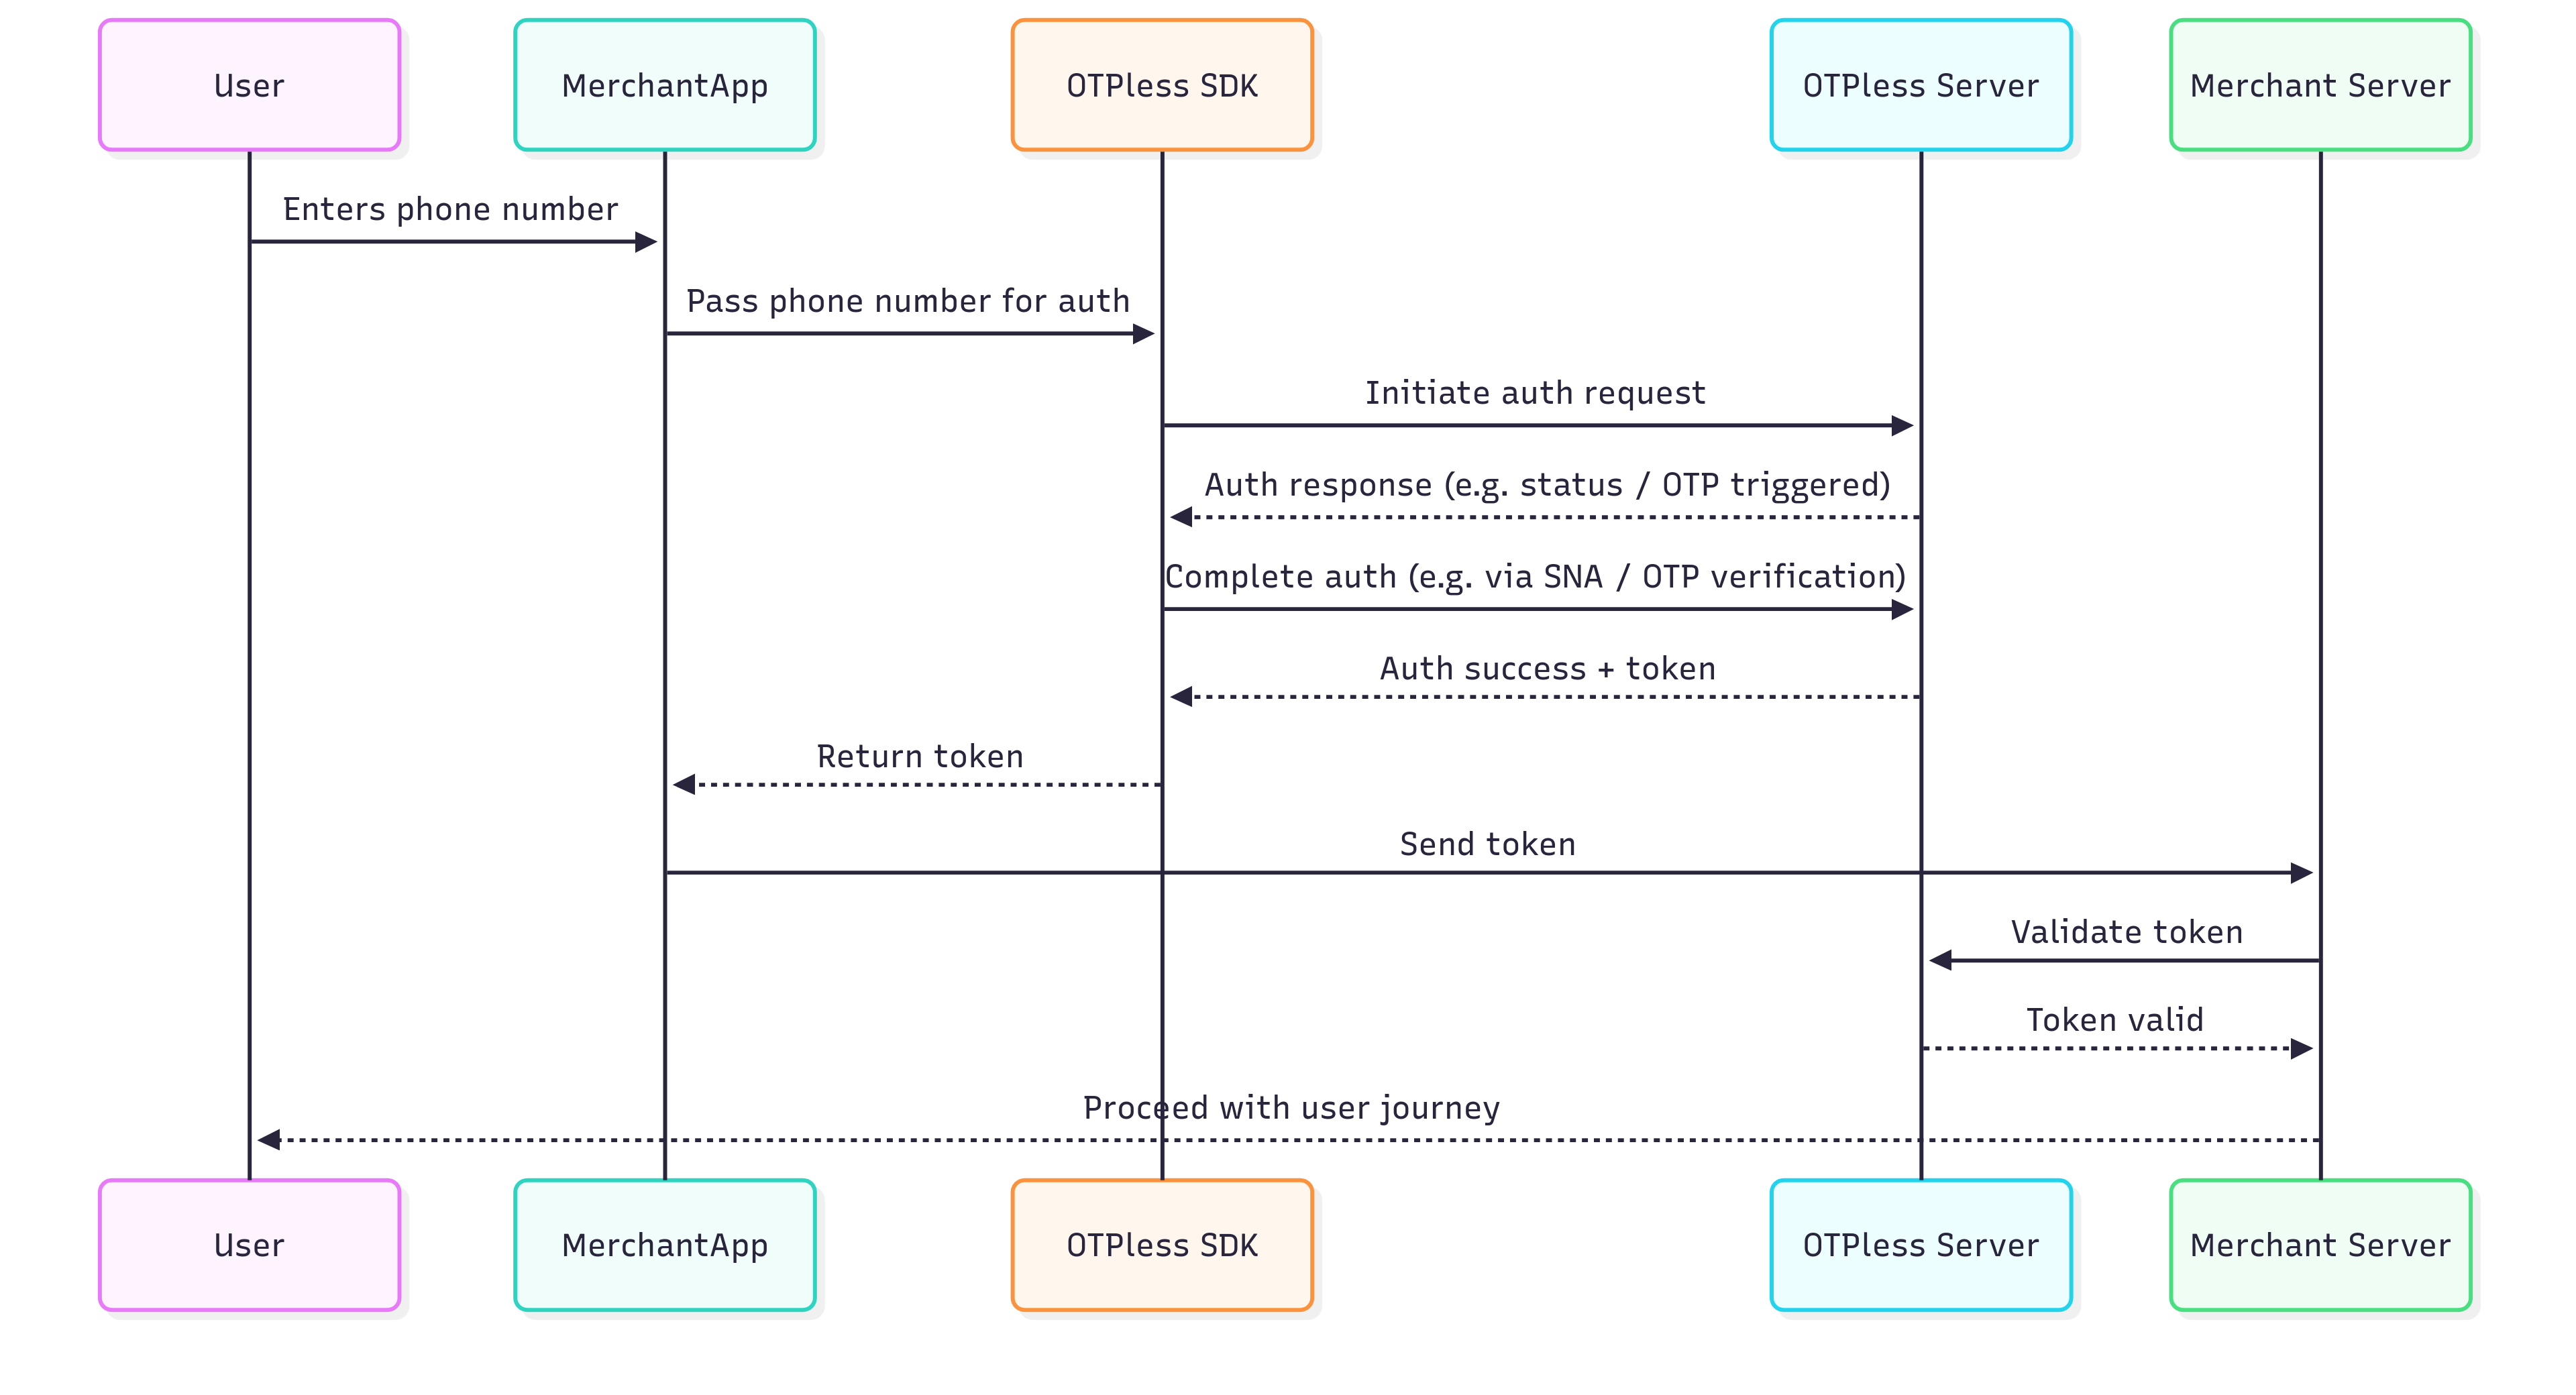
OTPless SDK accepts the user's identity (phone number or email), authenticates through multiple channels, and returns a secure token upon success.The merchant app sends this token to its backend, which verifies it with the OTPless Server before proceeding with the user journey.
 # Integration Steps
## Step 1: Install OTPLESS SDK Dependency
Install the OTPLESS SDK dependency by running the following command in your terminal at the root of your Ionic project:
```bash theme={null}
npm install otpless-ionic
```
## Step 2: Platform-specific Integrations
1. Add intent filter inside your `android/app/src/main/AndroidManifest.xml` file into your Main activity code block:
```xml theme={null}
```
2. Add Network Security Config inside your `android/app/src/main/AndroidManifest.xml` file into your `` code block (Only required if you are using the SNA feature):
```xml theme={null}
android:networkSecurityConfig="@xml/otpless_network_security_config"
```
Replace `YOUR_APP_ID` with [your actual App
ID](https://otpless.com/dashboard/customer/dev-settings/apiKeys) provided in
your OTPLESS dashboard.
3. Change your activity launchMode to singleTop and exported true for your Main Activity:
```xml theme={null}
android:launchMode="singleTop"
android:exported="true"
```
4. Add the following override method in `android/app/src/main/java/MainActivity.java` to handle callback:
* Import the following classes:
```java theme={null}
import com.otpless.ionic.OtplessPlugin;
import android.os.Bundle;
```
* Add this code to your `onCreate()` method in your main activity:
```java theme={null}
@Override
protected void onCreate(Bundle savedInstanceState) {
registerPlugin(OtplessPlugin.class);
super.onCreate(savedInstanceState);
}
```
* Add this code to your `onBackPressed()` method in your main activity:
```java theme={null}
@Override
public void onBackPressed() {
if (OtplessPlugin.onBackPressed(this)) return;
super.onBackPressed();
}
```
1. Add the following block to your `info.plist` file:
```xml info.plist theme={null}
CFBundleURLTypes
CFBundleURLSchemes
otpless.{{YOUR_APP_ID_IN_LOWERCASE}}
CFBundleTypeRole
Editor
CFBundleURLName
otpless
LSApplicationQueriesSchemes
whatsapp
otpless
gootpless
com.otpless.ios.app.otpless
googlegmail
```
2. Add the following block to your `ios/Runner/info.plist` file (Only required if
you are using the SNA feature):
```xml info.plist theme={null}
NSAllowsArbitraryLoads
NSExceptionDomains
80.in.safr.sekuramobile.com
NSIncludesSubdomains
NSTemporaryExceptionAllowsInsecureHTTPLoads
NSTemporaryExceptionMinimumTLSVersion
TLSv1.1
partnerapi.jio.com
NSIncludesSubdomains
NSTemporaryExceptionAllowsInsecureHTTPLoads
NSTemporaryExceptionMinimumTLSVersion
TLSv1.1
```
Replace `YOUR_APP_ID` with [your actual App
ID](https://otpless.com/dashboard/customer/dev-settings/apiKeys) provided in
your OTPLESS dashboard.
3. Import the OTPLESS SDK in your respective `AppDelegate.swift` file to handle redirection.
```swift AppDelegate.swift theme={null}
import OtplessSDK
override func application(_ app: UIApplication, open url: URL, options: [UIApplication.OpenURLOptionsKey : Any] = [:]) -> Bool {
if Otpless.sharedInstance.isOtplessDeeplink(url: url){
Otpless.sharedInstance.processOtplessDeeplink(url: url)
return true
}
super.application(app, open: url, options: options)
return true
}
```
## Step 3: Setup your login screen
In your login screen, add the following code to initialize OTPLESS SDK:
```javascript Javascript theme={null}
import {OtplessManager} from 'otpless-ionic';
let manager = new OtplessManager();
useEffect(() => {
manager.initHeadless(APPID);
manager.setHeadlessCallback(onHeadlessResult);
return () => {
manager.clearListener();
}
}, []);
```
Now, let's implement a callback method to handle the response from the OTPLESS SDK:
```javascript Javascript theme={null}
const onHeadlessResult = (result: any) => {
const responseType = result.responseType;
switch (responseType) {
case "INITIATE": {
// Notify that headless authentication has been initiated
console.log("Headless authentication initiated");
break;
}
case "VERIFY": {
// Notify that verification is completed
// This is notified just before "ONETAP" final response
console.log("Verification completed");
break;
}
case "OTP_AUTO_READ": {
if (Platform.OS === "android") {
const otp = result.response.otp;
console.log(`OTP Received: ${otp}`);
}
break;
}
case "ONETAP": {
const token = result.response.token;
console.log(`OneTap Data: ${token}`);
break;
}
case "FALLBACK_TRIGGERED": {
// A fallback occurs when an OTP delivery attempt on one channel fails,
// and the system automatically retries via the subsequent channel selected on Otpless Dashboard.
// For example, if a merchant opts for SmartAuth with primary channal as WhatsApp and secondary channel as SMS,
// in that case, if OTP delivery on WhatsApp fails, the system will automatically retry via SMS.
// The response will contain the deliveryChannel to which the OTP has been sent.
if (response.response.deliveryChannel != null) {
const newDeliveryChannel = response.response.deliveryChannel // This is the deliveryChannel to which the OTP has been sent
}
break;
}
default: {
console.warn(`Unknown response type: ${responseType}`);
break;
}
}
};
```
## Step 4: Initiate Authentication
Well done! You have completed the foundational setup of the SDK. Now, let’s move to the next step and understand how to initiate and verify different authentication modes.
**Choose the authentication mode you want to integrate from the options below:**
Send a One-Time Password (OTP) via SMS, WhatsApp, or Email for secure user verification.
Provide a seamless login experience by sending an authentication link through SMS, WhatsApp, or Email.
Authenticate users through popular social applications like WhatsApp, Google, Apple, and GitHub.
# Integration Steps
## Step 1: Install OTPLESS SDK Dependency
Install the OTPLESS SDK dependency by running the following command in your terminal at the root of your Ionic project:
```bash theme={null}
npm install otpless-ionic
```
## Step 2: Platform-specific Integrations
1. Add intent filter inside your `android/app/src/main/AndroidManifest.xml` file into your Main activity code block:
```xml theme={null}
```
2. Add Network Security Config inside your `android/app/src/main/AndroidManifest.xml` file into your `` code block (Only required if you are using the SNA feature):
```xml theme={null}
android:networkSecurityConfig="@xml/otpless_network_security_config"
```
Replace `YOUR_APP_ID` with [your actual App
ID](https://otpless.com/dashboard/customer/dev-settings/apiKeys) provided in
your OTPLESS dashboard.
3. Change your activity launchMode to singleTop and exported true for your Main Activity:
```xml theme={null}
android:launchMode="singleTop"
android:exported="true"
```
4. Add the following override method in `android/app/src/main/java/MainActivity.java` to handle callback:
* Import the following classes:
```java theme={null}
import com.otpless.ionic.OtplessPlugin;
import android.os.Bundle;
```
* Add this code to your `onCreate()` method in your main activity:
```java theme={null}
@Override
protected void onCreate(Bundle savedInstanceState) {
registerPlugin(OtplessPlugin.class);
super.onCreate(savedInstanceState);
}
```
* Add this code to your `onBackPressed()` method in your main activity:
```java theme={null}
@Override
public void onBackPressed() {
if (OtplessPlugin.onBackPressed(this)) return;
super.onBackPressed();
}
```
1. Add the following block to your `info.plist` file:
```xml info.plist theme={null}
CFBundleURLTypes
CFBundleURLSchemes
otpless.{{YOUR_APP_ID_IN_LOWERCASE}}
CFBundleTypeRole
Editor
CFBundleURLName
otpless
LSApplicationQueriesSchemes
whatsapp
otpless
gootpless
com.otpless.ios.app.otpless
googlegmail
```
2. Add the following block to your `ios/Runner/info.plist` file (Only required if
you are using the SNA feature):
```xml info.plist theme={null}
NSAllowsArbitraryLoads
NSExceptionDomains
80.in.safr.sekuramobile.com
NSIncludesSubdomains
NSTemporaryExceptionAllowsInsecureHTTPLoads
NSTemporaryExceptionMinimumTLSVersion
TLSv1.1
partnerapi.jio.com
NSIncludesSubdomains
NSTemporaryExceptionAllowsInsecureHTTPLoads
NSTemporaryExceptionMinimumTLSVersion
TLSv1.1
```
Replace `YOUR_APP_ID` with [your actual App
ID](https://otpless.com/dashboard/customer/dev-settings/apiKeys) provided in
your OTPLESS dashboard.
3. Import the OTPLESS SDK in your respective `AppDelegate.swift` file to handle redirection.
```swift AppDelegate.swift theme={null}
import OtplessSDK
override func application(_ app: UIApplication, open url: URL, options: [UIApplication.OpenURLOptionsKey : Any] = [:]) -> Bool {
if Otpless.sharedInstance.isOtplessDeeplink(url: url){
Otpless.sharedInstance.processOtplessDeeplink(url: url)
return true
}
super.application(app, open: url, options: options)
return true
}
```
## Step 3: Setup your login screen
In your login screen, add the following code to initialize OTPLESS SDK:
```javascript Javascript theme={null}
import {OtplessManager} from 'otpless-ionic';
let manager = new OtplessManager();
useEffect(() => {
manager.initHeadless(APPID);
manager.setHeadlessCallback(onHeadlessResult);
return () => {
manager.clearListener();
}
}, []);
```
Now, let's implement a callback method to handle the response from the OTPLESS SDK:
```javascript Javascript theme={null}
const onHeadlessResult = (result: any) => {
const responseType = result.responseType;
switch (responseType) {
case "INITIATE": {
// Notify that headless authentication has been initiated
console.log("Headless authentication initiated");
break;
}
case "VERIFY": {
// Notify that verification is completed
// This is notified just before "ONETAP" final response
console.log("Verification completed");
break;
}
case "OTP_AUTO_READ": {
if (Platform.OS === "android") {
const otp = result.response.otp;
console.log(`OTP Received: ${otp}`);
}
break;
}
case "ONETAP": {
const token = result.response.token;
console.log(`OneTap Data: ${token}`);
break;
}
case "FALLBACK_TRIGGERED": {
// A fallback occurs when an OTP delivery attempt on one channel fails,
// and the system automatically retries via the subsequent channel selected on Otpless Dashboard.
// For example, if a merchant opts for SmartAuth with primary channal as WhatsApp and secondary channel as SMS,
// in that case, if OTP delivery on WhatsApp fails, the system will automatically retry via SMS.
// The response will contain the deliveryChannel to which the OTP has been sent.
if (response.response.deliveryChannel != null) {
const newDeliveryChannel = response.response.deliveryChannel // This is the deliveryChannel to which the OTP has been sent
}
break;
}
default: {
console.warn(`Unknown response type: ${responseType}`);
break;
}
}
};
```
## Step 4: Initiate Authentication
Well done! You have completed the foundational setup of the SDK. Now, let’s move to the next step and understand how to initiate and verify different authentication modes.
**Choose the authentication mode you want to integrate from the options below:**
Send a One-Time Password (OTP) via SMS, WhatsApp, or Email for secure user verification.
Provide a seamless login experience by sending an authentication link through SMS, WhatsApp, or Email.
Authenticate users through popular social applications like WhatsApp, Google, Apple, and GitHub.